Evergreen Webinar funnels.
Those are pretty hot buzzwords flying around the digital marketing world right now. There's also plenty of platforms out there to choose from to create your evergreen webinar funnel.
With those platforms and plug-ins come all kinds of costs, monthly fees, integrations, API keys... bla, bla, bla..
Don't get me wrong,
I am not beating up on these products as many are quite good and I work in them for clients frequently.
However, if you are not running live webinars or livestreams on a regular basis but you want the ability to have an Evergreen Webinar Funnel then this tutorial is for you!
Before I get in to the full training, I want to state that I built this Evergreen Webinar Funnel using Infusionsoft which is a paid system that is a CRM, automated marketing platform and eCommerce platform all in one.
If You don't have it, that's OK but this tutorial is designed for Infusionsoft. If you want a demo of it, message me as I am an Infusionsoft Certified Partner.

OK, now that we are good on the disclaimer, let's get to the good stuff.
This tutorial is a notch above 'Beginner Level' so if, at any point in this, you get stuck just drop me a comment or send me an email and I'll do my best to help you out.
I strongly suggest you watch the training video first, it will make things much clearer for you!
The video is roughly 50 minutes long and covers every detail for you to build this.
You can also see my live Evergreen Webinar demo.
Click here and enter your email to see it in action.
You ready to rock? Let's get going!
Building an Evergreen Webinar Funnel
Step 1 - Create Custom Fields
We're going to start off by creating some Custom Fields. To do this, go to Admin>Settings and then click on "Go" to access the Contact Custom Fields.
Here's what it looks like:

Click on this image to see a larger example.
Here are the names and types of Custom Fields you are going to create:
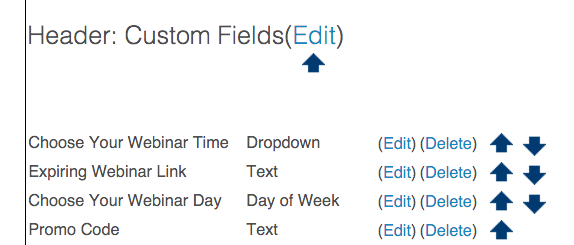
Click on this image to see a larger example.
Step 2 - Create The Campaign & Landing Pages
You are now going to create a new campaign and create 7 Landing Pages. Yes, 7!
Here are the 7 pages you will want to create.
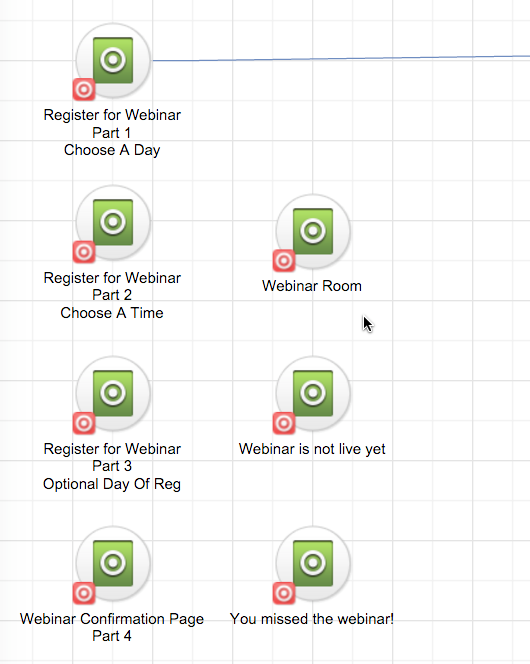
Make sure to name the Landing Pages with a clear name that shows the step it is meant for. It'll enable you to easily identify them as you build this campaign.
Step 3 - The Webinar Registration: Choose the Day
Next, you are going to start building the Webinar Registration Landing Page. The way we are going to design this is we are going to ask them the very least amount of questions. For this, it's "Choose Your Webinar Day".
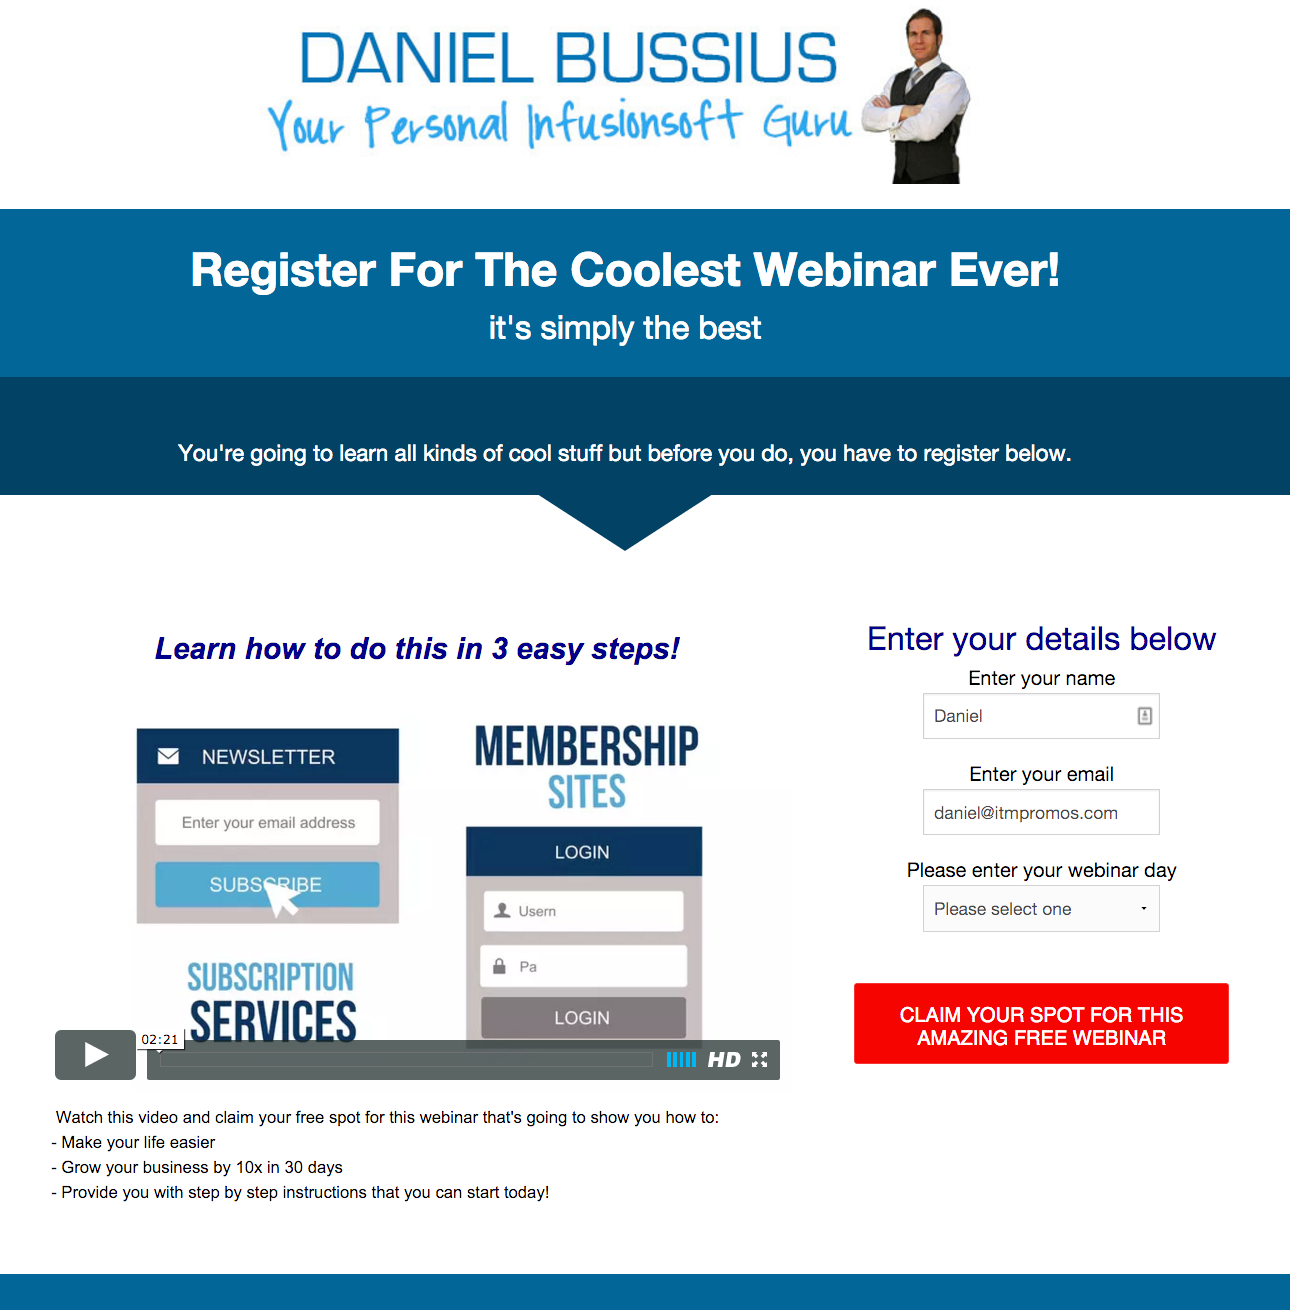
Here's what mine looks like:
See how this Landing Page only gives them one choice to make? We want to keep this as simple as possible for them. Click on this image to see a larger example.
Note: We want to give them the ability to choose ANY day because this is an Evergreen Webinar. Following me so far? Sweet, let's move to the next step.
Now, we need to link this first Landing Page to the 2nd Page so we can then ask them what time they wish to attend.
We'll do this by going to the Thank You page and then selecting the web address option as well as "Pass contact's info to the thank you page" .
The code you drop in for the URL is your next Landing Page which I had you label as "Register for Webinar Part 2".

Note: You'll always want to pass info from each Landing Page to the next Landing Page in the sequential order that we built them in. That's why I had you label each page with a "Part 1,2,3". Click on this image to see a larger example.
Step 4 - The Webinar Registration: Choose the Time
Our next Landing Page we are going to use a hidden email field to pass the contact data from the first form to the second form. You can find this field in your Field Snippets section of the Landing Page Builder and under "Hidden Fields".
The only question you are going to ask them on this page is what time they wish to attend. Now, this is an Evergreen Webinar but we do want to give the impression of some scarcity so we provide 3 times. You can have more if you like or only one - totally up to you!
The time selection we provide to them is designed with a radio button and I have created tags for every time. It's important we do this as the tag will send the person down the right path.
Here's what my page looks like.
Notice the design looks the same from Register for Webinar Part 1 as we want the look and feel to remain constant through this process.
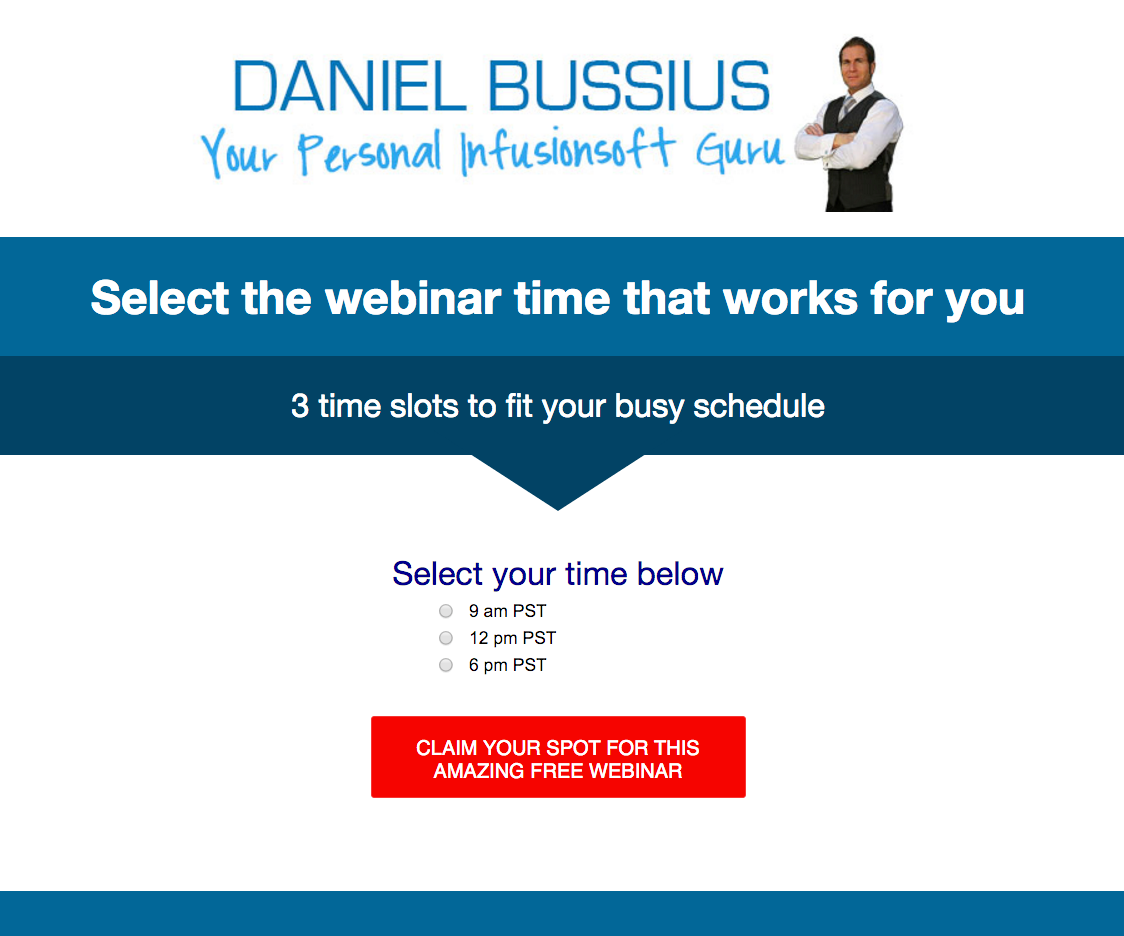
Note: the radio button has Webinar time tags sitting behind each choice. Click on this image to see a larger example.
As we did in Webinar Registration Part 1, we are going to se the Thank You Page on this page to pass contact's info and link the page to the next URL which is Webinar Registration Part 3.
Step 5 - The Webinar Registration: Wait! We're About To Start in 15 Minutes
On this Landing Page we are going to make sure we have another Hidden Email Field in the form to ensure our data keeps getting passed along the way.
We are also going to create a Checkbox with a tag. The tag behind the Checkbox is named Webinar: Today. This will be our trigger to enable this person to bypass waiting for the upcoming webinars and jump in to the next webinar (that just so happens) is about to start in 15 minutes.
So why would we offer them a webinar that is just about to start?
Well, they are at your page now and ready to do something so let's give them the option to do that right now. Why make them wait so they can only grow cold and possibly spend their money or find another solution before the webinar date.
Make sense?
Let's keep the lead hot, while they are hot and leave little room for them to cool off.
Here's what my Landing Page looks like:
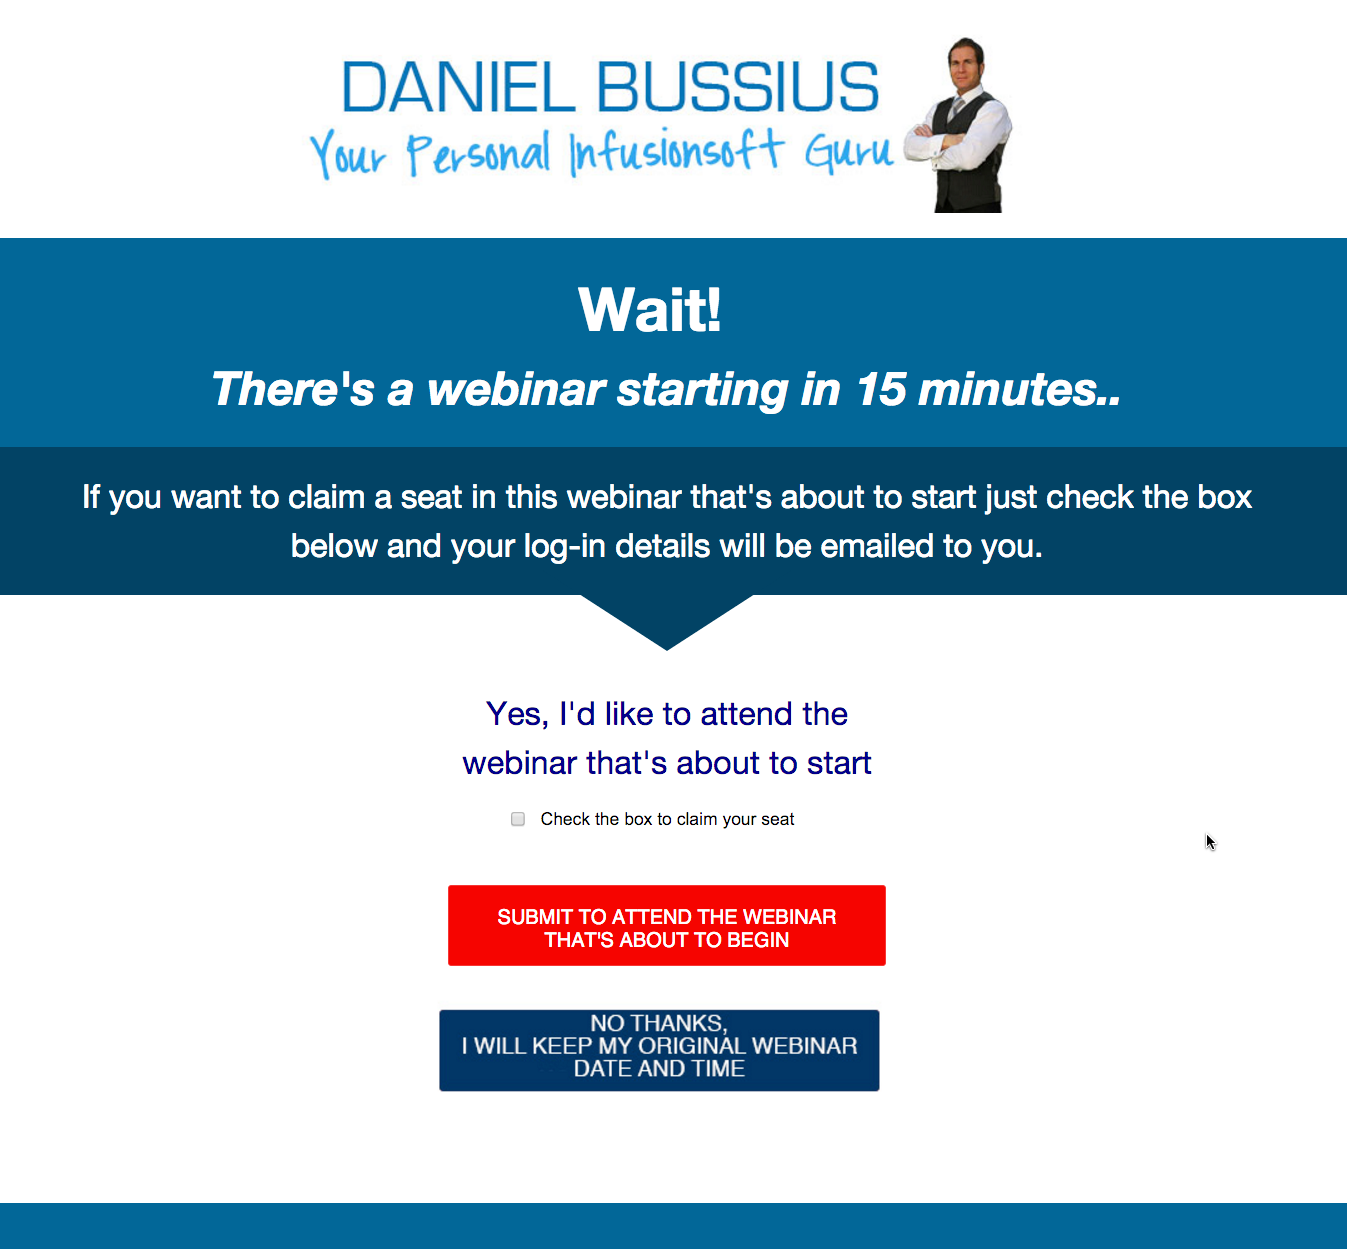
The blue button that gives the user the option to keep their original webinar day and time is a JPEG image that is linked to the Webinar Confirmation Page. Click on this image to see a larger example.
Step 6 - The Webinar Confirmation Process: Day Sequence
We now have our Webinar Confirmation Page linked up and we are ready to start setting up the automation.
The first thing we are going to is create a campaign sequence for each day of the week.
Inside each Day Sequence we are going to have a tag for the day of the week as well as 1 minute delay timer set to wait for the day of the week within that sequence.

What I mean is that if you have a Sunday sequence, then your delay timer will be set so that it only fires on Sundays. Click on this image to see a larger example.
We then will connect Register for Webinar Part 1 to all of the campaign sequences named for the day of the week.
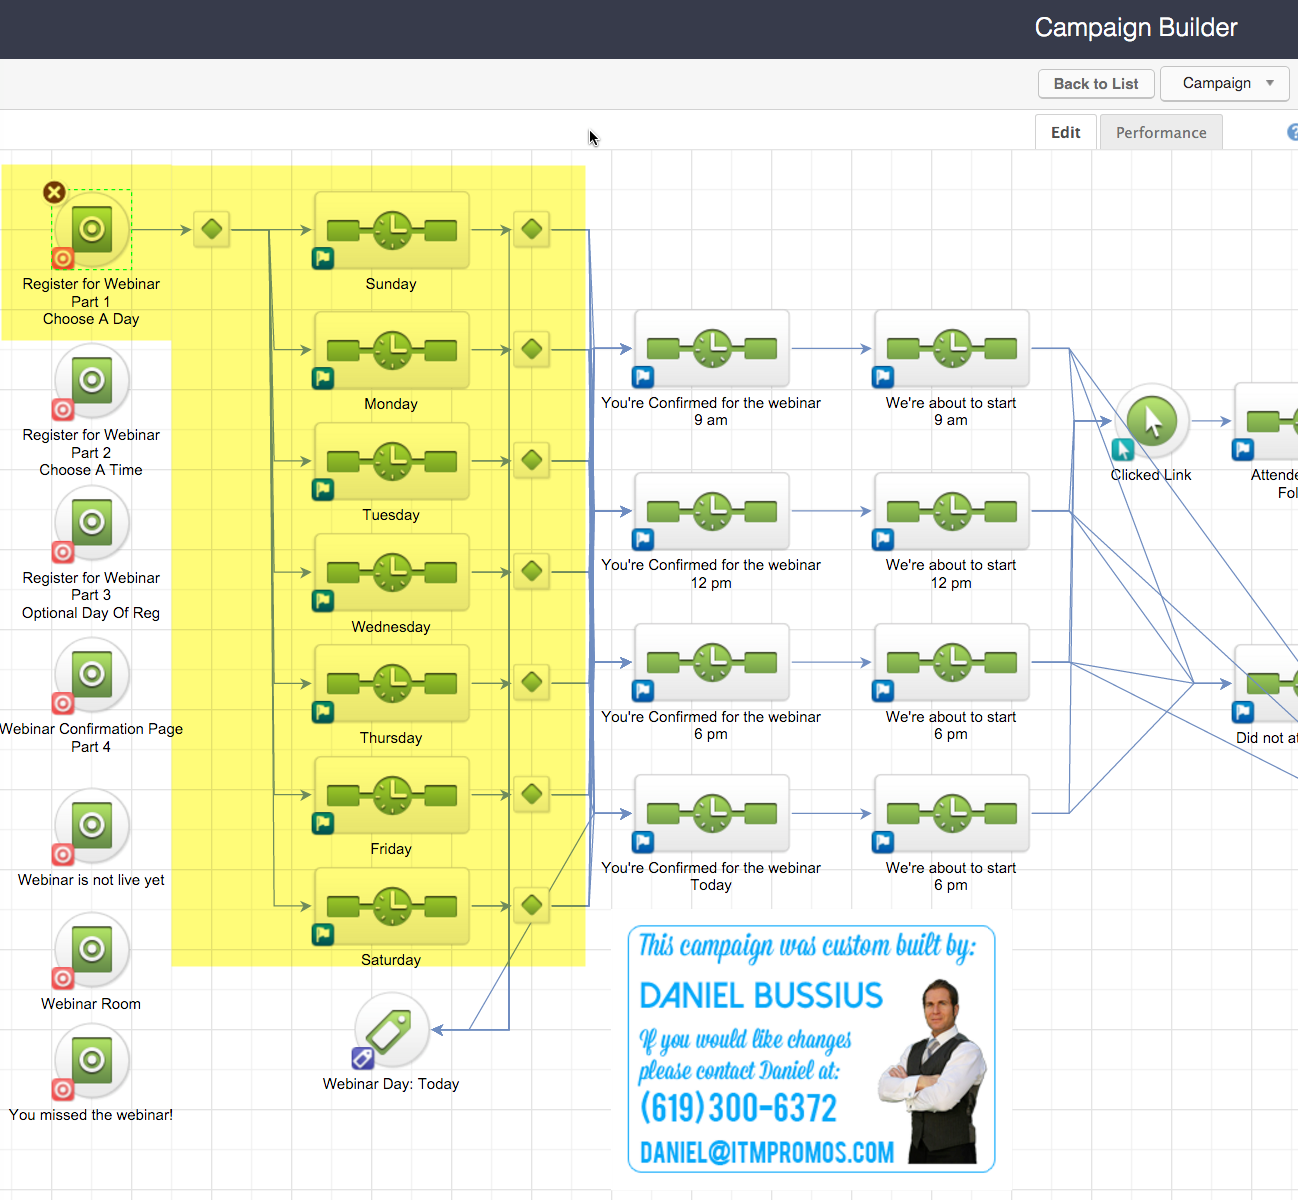
Once you link the Register for Webinar Part 1 page to all the days of the week sequences you will see a Decision Diamond created. Click on this image to see a larger example.
Now you need to create the logic for your Decision Diamond.
Here's what it should look like:
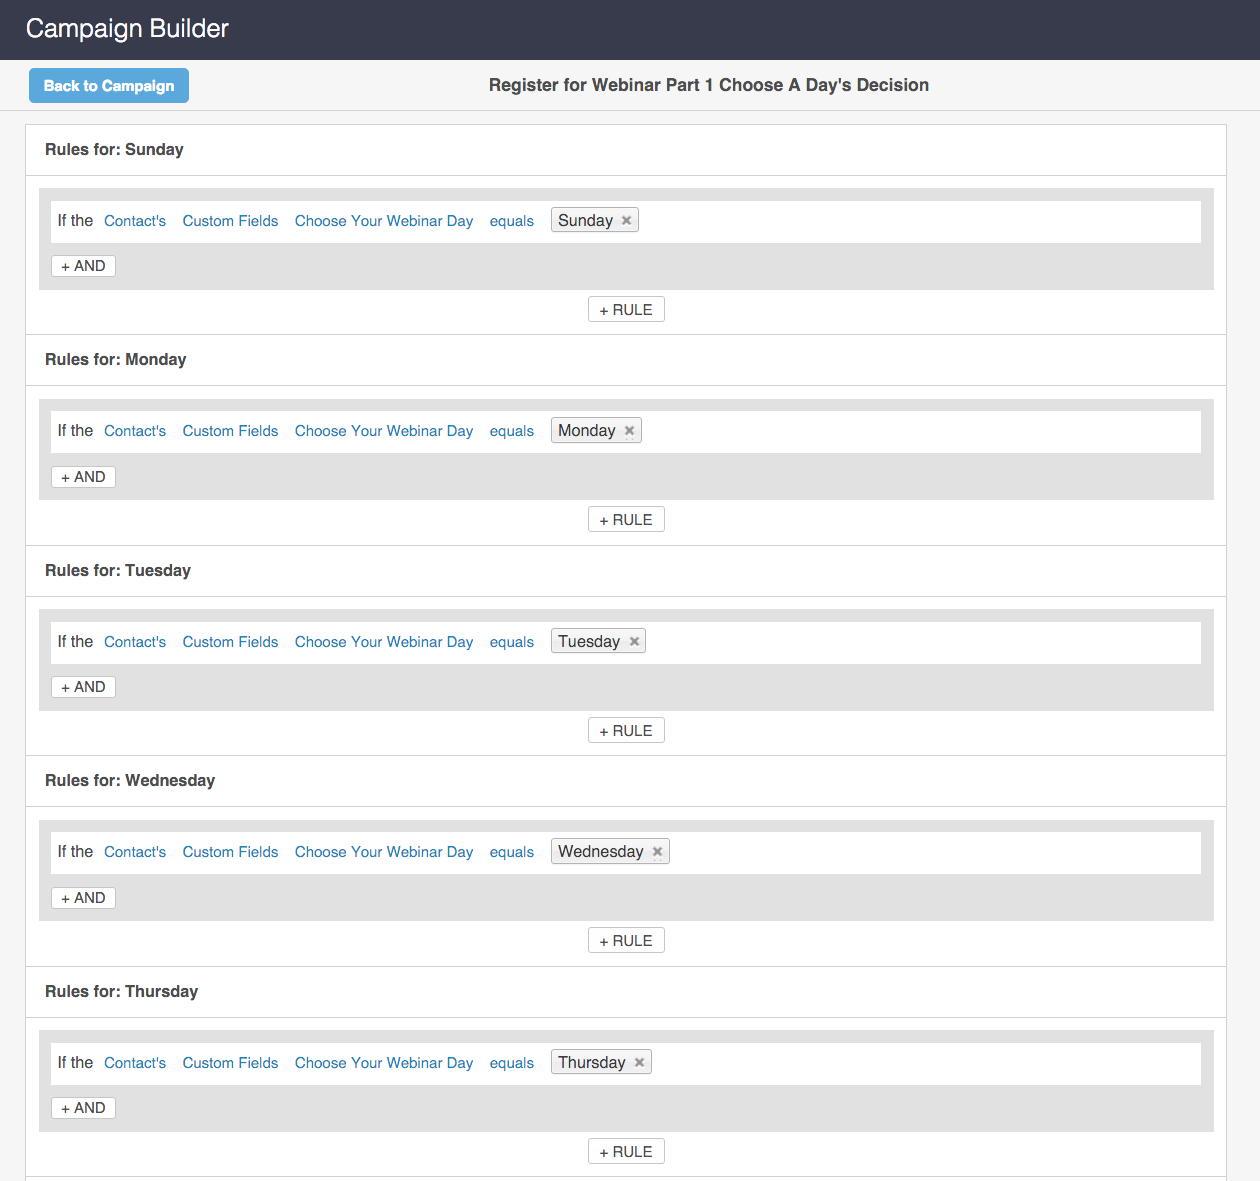
Notice that we are using the Custom Field we created named Choose Your Webinar Day as the logic to send the registrant down the right path. Click on this image to see a larger example.
Step 7 - The Webinar Confirmation Process: Time Sequence
We're now going to link those Day campaigns to the Times the registrant chose.
We are going to do that by having the identical sequence we build with reminders, etc duplicated for each time option we offered them.
In my example I offer 3 times plus a Today option. That is 4 options so we will need 4 paths.
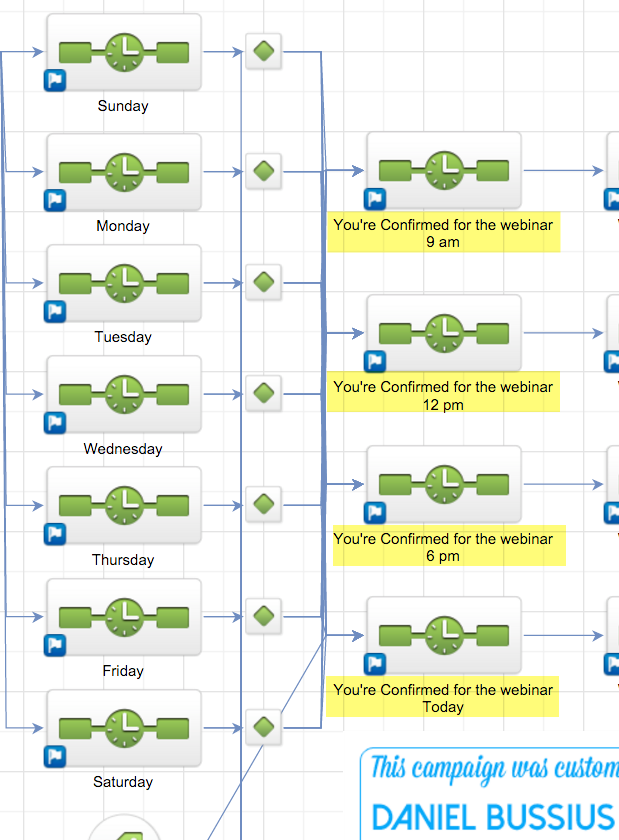
The new Decision Diamonds that will be created when we link every day of the week to every possible webinar time will be identical in logic except the Sunday logic will be for Sunday. Click on this image to see a larger example.
You are going to link every day of the week to every possible webinar time. Once you've done that you will see Decision Diamonds have been created.
The logic in each Decision Diamond will be identical except the logic for each day of the week will match it's that specific day of the week. For example: Sunday logic matches the Sunday tag.
See below for the screenshot. It'll completely make sense.
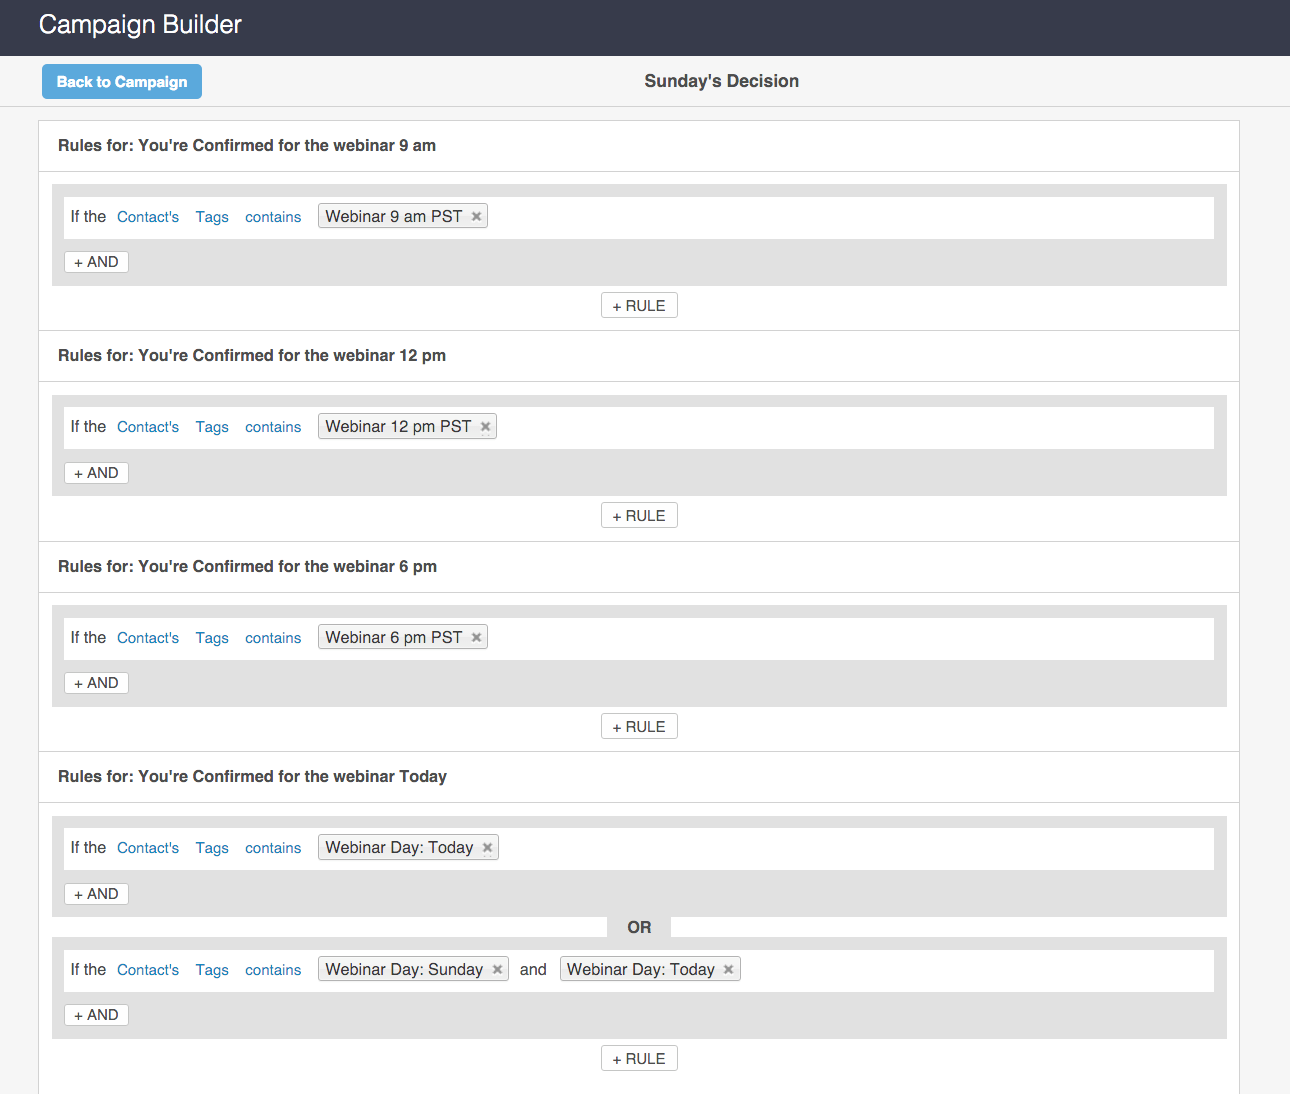
Notice for the Today logic we have the tag contains logic with the day tag plus the Today tag.
Click on this image to see a larger example.
Step 8 - The Webinar Emails
Inside the "You're confirmed for the webinar" sequence for TODAY only, you will set up the steps slightly different. You will remove all day tags and remove all time tags.
See below for screenshot.

The Today confirmation sequence is the only sequence that strips away all day and time tags at this part in the campaign. Click on this image to see a larger example.
Now we are ready to set up the webinar emails.
Here is where we are at in this build out:
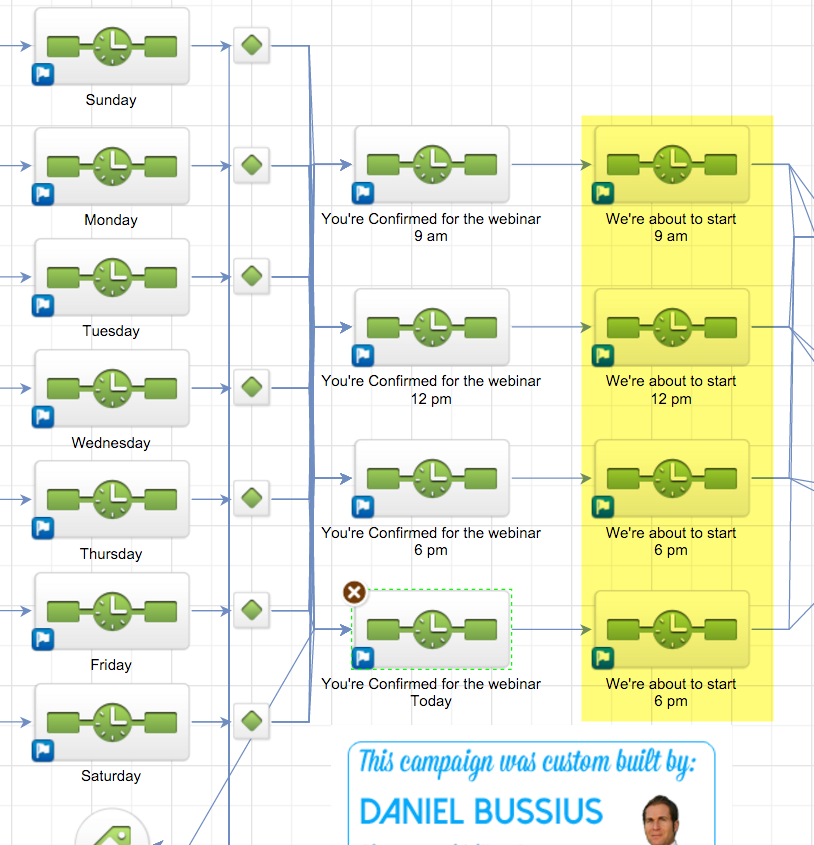
These sequences will have the same information in them except the times will be specific to the webinar time options we created. Click on this image to see a larger example.
We are now going to use that custom field we created that is the Webinar Expiring Link. Specifically what we are going to do is set the link inside the email to different pages as we progress through the webinar sequence.
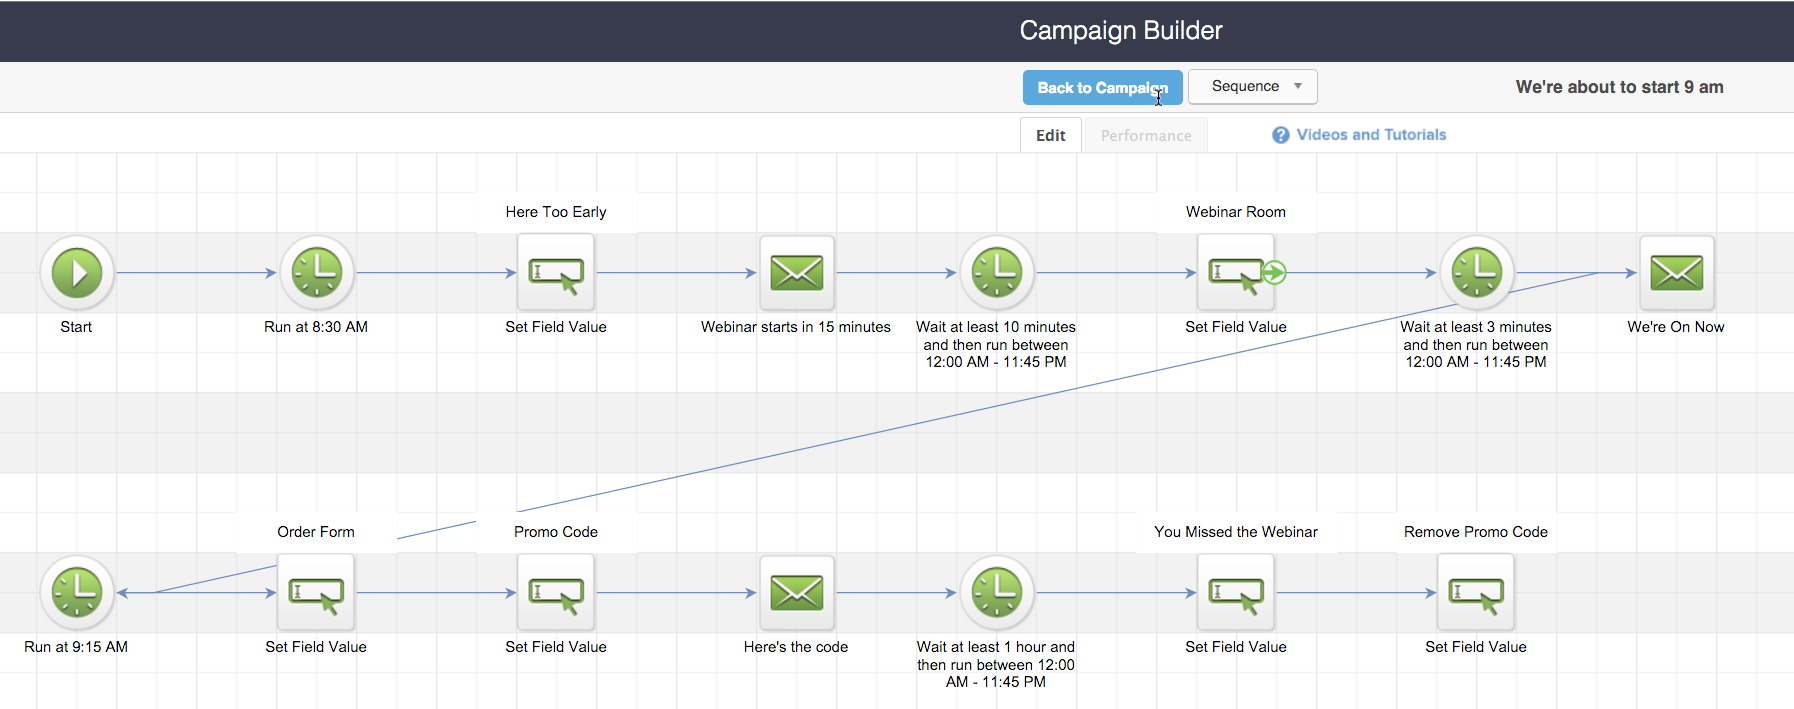
These sequences will have the same information in them except the times will be specific to the webinar time options we created. Click on this image to see a larger example.
The first Set Field Value we will set to the Webinar Not Live Landing Page.
We will then fire off the email with the Custom Field named Webinar Expiring Link as the actual link in the email. That will be be linked to our page Webinar Not Live page.
Then, we will change the Set Field Value again 5 minutes before the webinar is about to start and the same custom field will be changed to our link for the Webinar Room page.
15 minutes in to the webinar we will change the link again for the same custom field and input the Order Form link.
The promo offer email will then be sent with the offer link.
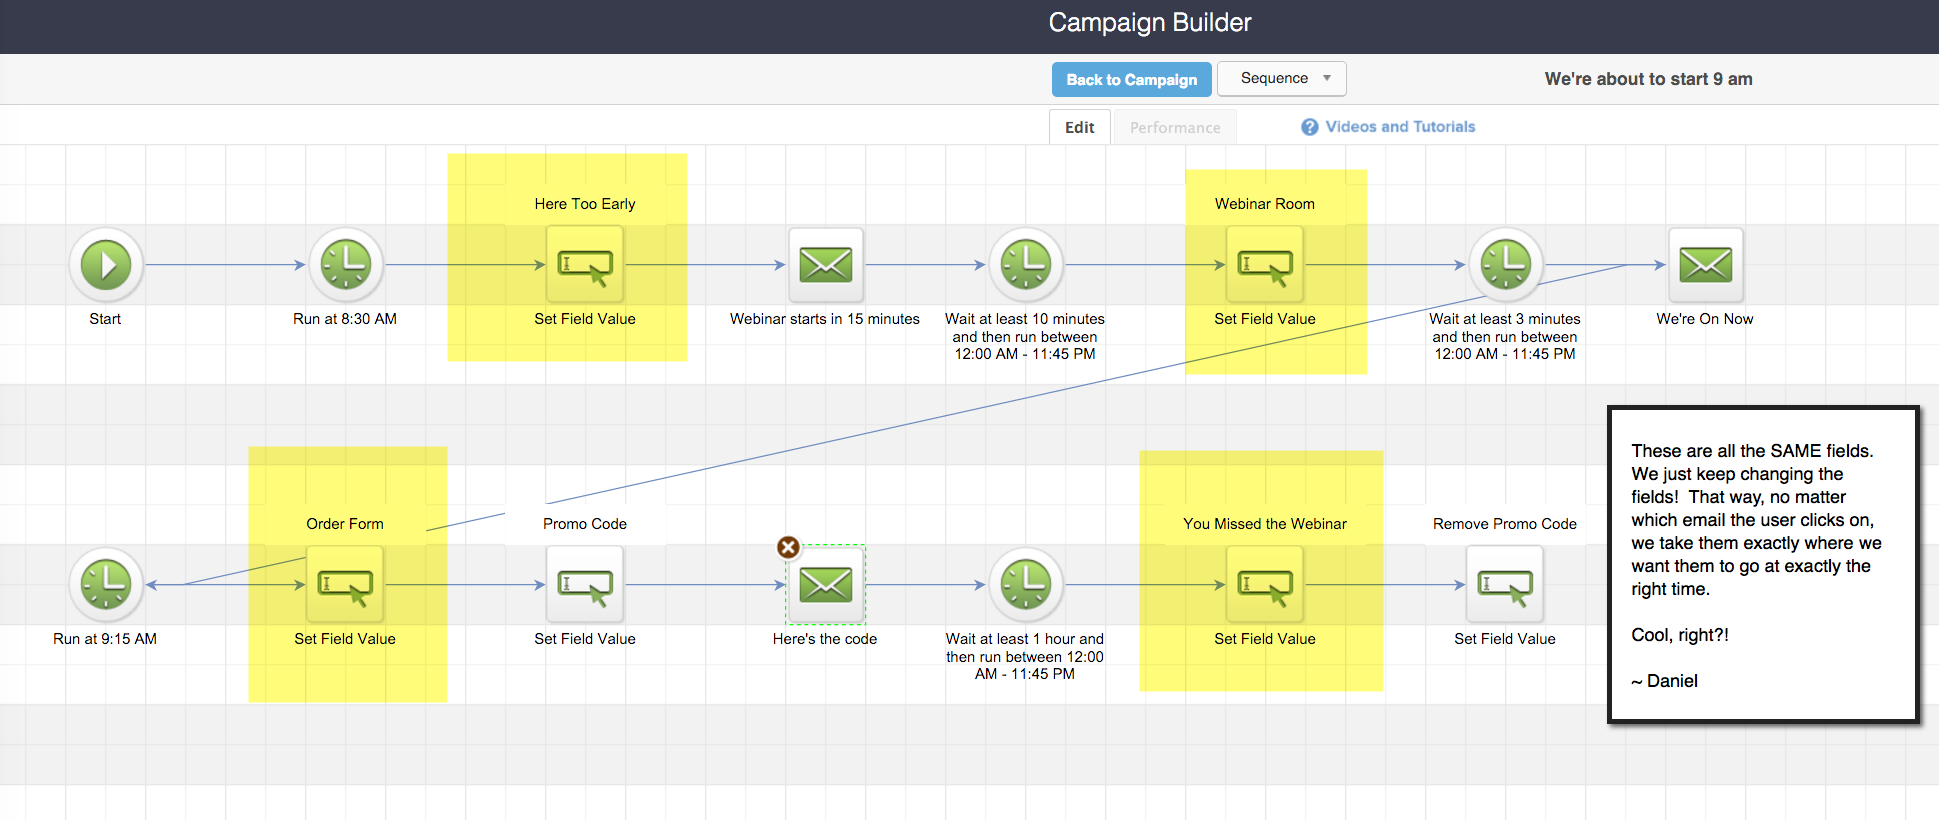
We keep changing the custom field in the Webinar Expiring Link throughout this sequence.
Click on this image to see a larger example.
Remember from watching the Tutorial Video that you will have an offer that will hit at 14 minutes in to the webinar so this email is going to hit their inbox at exactly the time you pitch them in your Evergreen Webinar.
Your webinar promo code custom field will also get set with your custom promo code you provide them to use so they can get their special offer.
Step 9 - Link Goals: Who Attended/Who Didn't
We're now going to set up a Link Click Goal and connect all the webinar time sequences to this one goal.
Here's where we are at for connecting all the times to the Link Click Goal and they Did Not Attend Webinar Sequence:
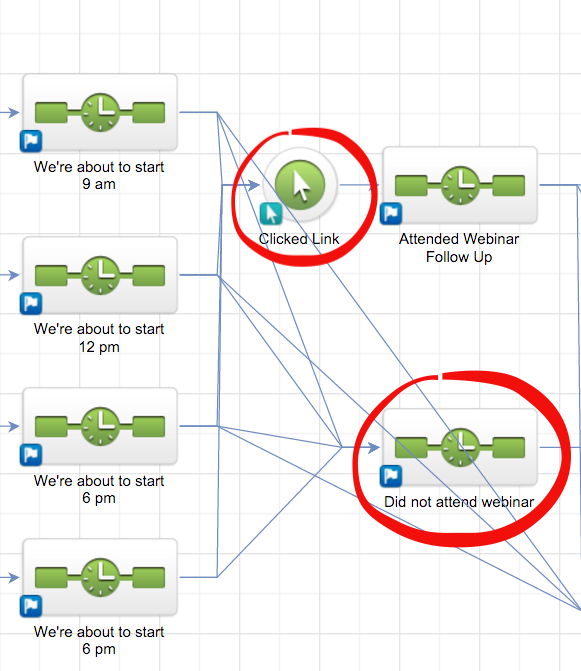
Every webinar time sequences converges in to this one Link Click Goal or the Did not attend webinar sequence.
Click on this image to see a larger example.
We know that there is no way for them to attend the webinar unless they clicked on our links we sent in the email so if our link click goal isn't reached we safely know they did not attend the webinar and can send them down a different path.
Here's what the link click goals look like.
Note: they are all the same for each webinar times.
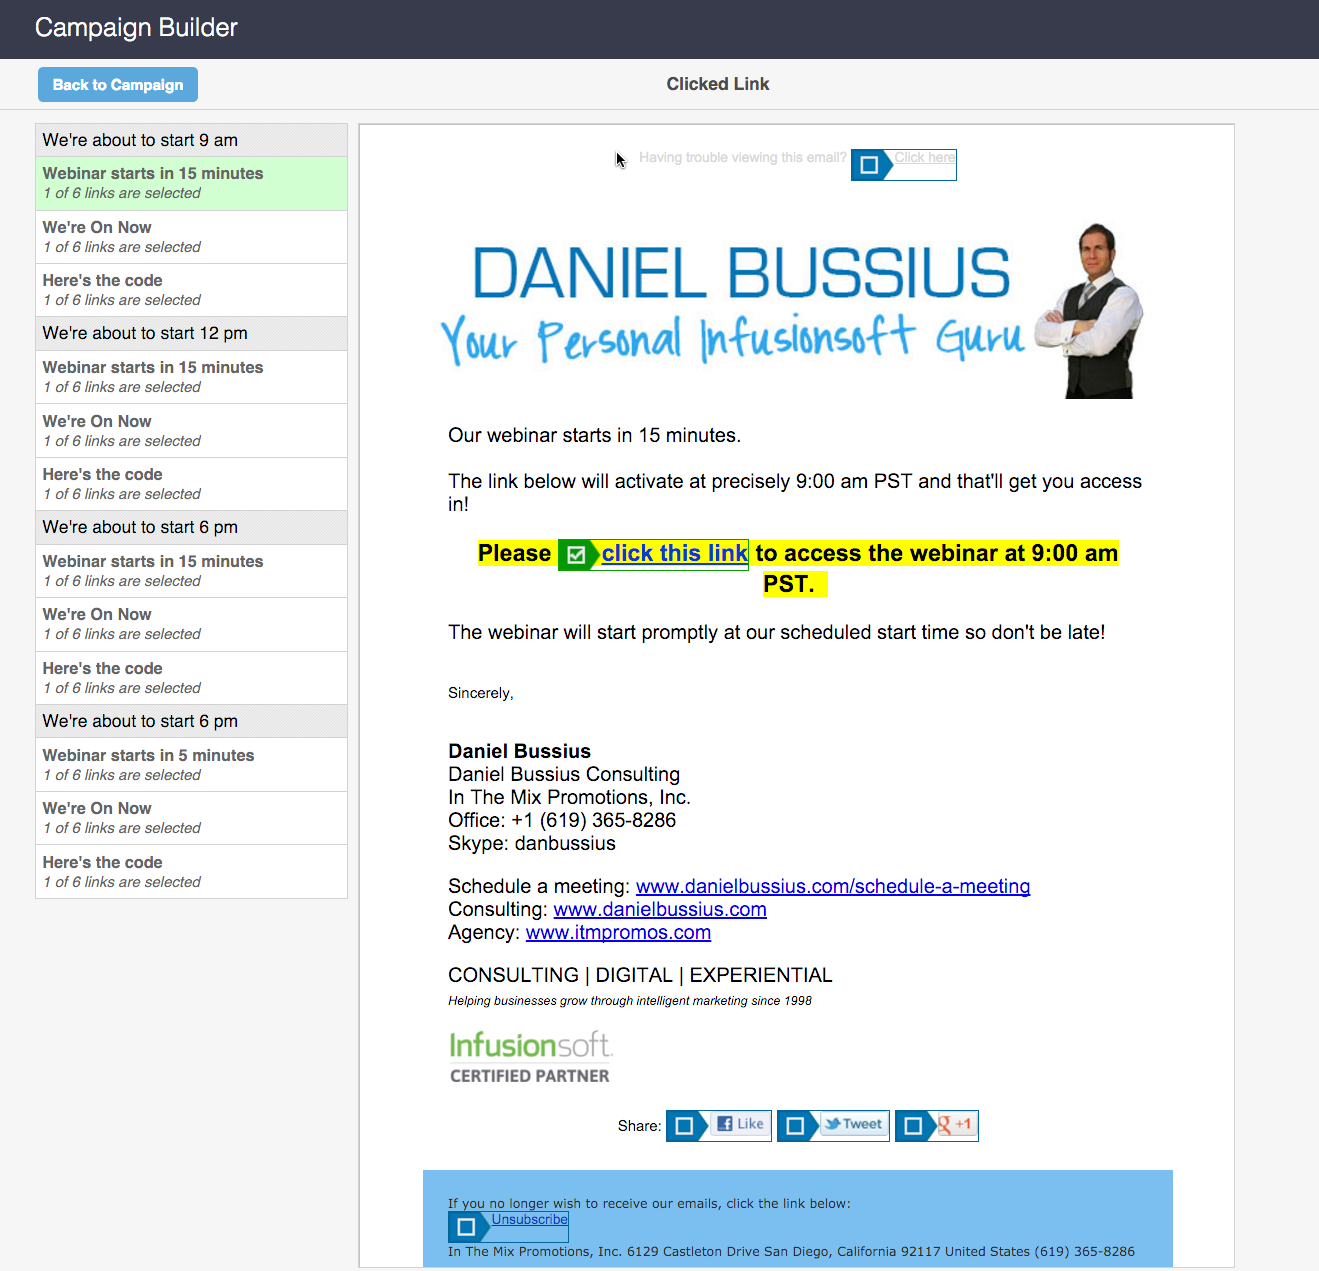
Link Click Goals are set to every email that has the link for them to attend the webinar. You'll want to make sure every webinar time set of emails has the same link click goals set. Click on this image to see a larger example.
Step 10 - The Follow Up Sequence
We're at the end!!
But hang tight there Speedy Gonzalez.
We still have just one more thing to do. It's the follow up sequence based on who attended and who did not.
At this point I'll let you decide what you want to do but here's my two cents for you.
Those who attended but did not buy your offer should get a specific follow up sequence speaking to them differently than the second follow up sequence
The second follow up sequence is for those who did not attend.
These people should be provided with a chance to reschedule their webinar and attend. You can choose how long they stay in the webinar sequence before they either reschedule or you just pull them out.
Totally up to you.
The takeaway here is that you have to have two follow up sequences specific to those who attended and those who did not.
Either way, if you got this far then you are a rock star.
Oh, and you should have a kick butt turn-key Everygreen Webinar and automated sales funnel designed to attract, convert and nurture for you 24 hours a day, 7 days a week and 365 days a year.
Here's what your entire campaign should now look like:
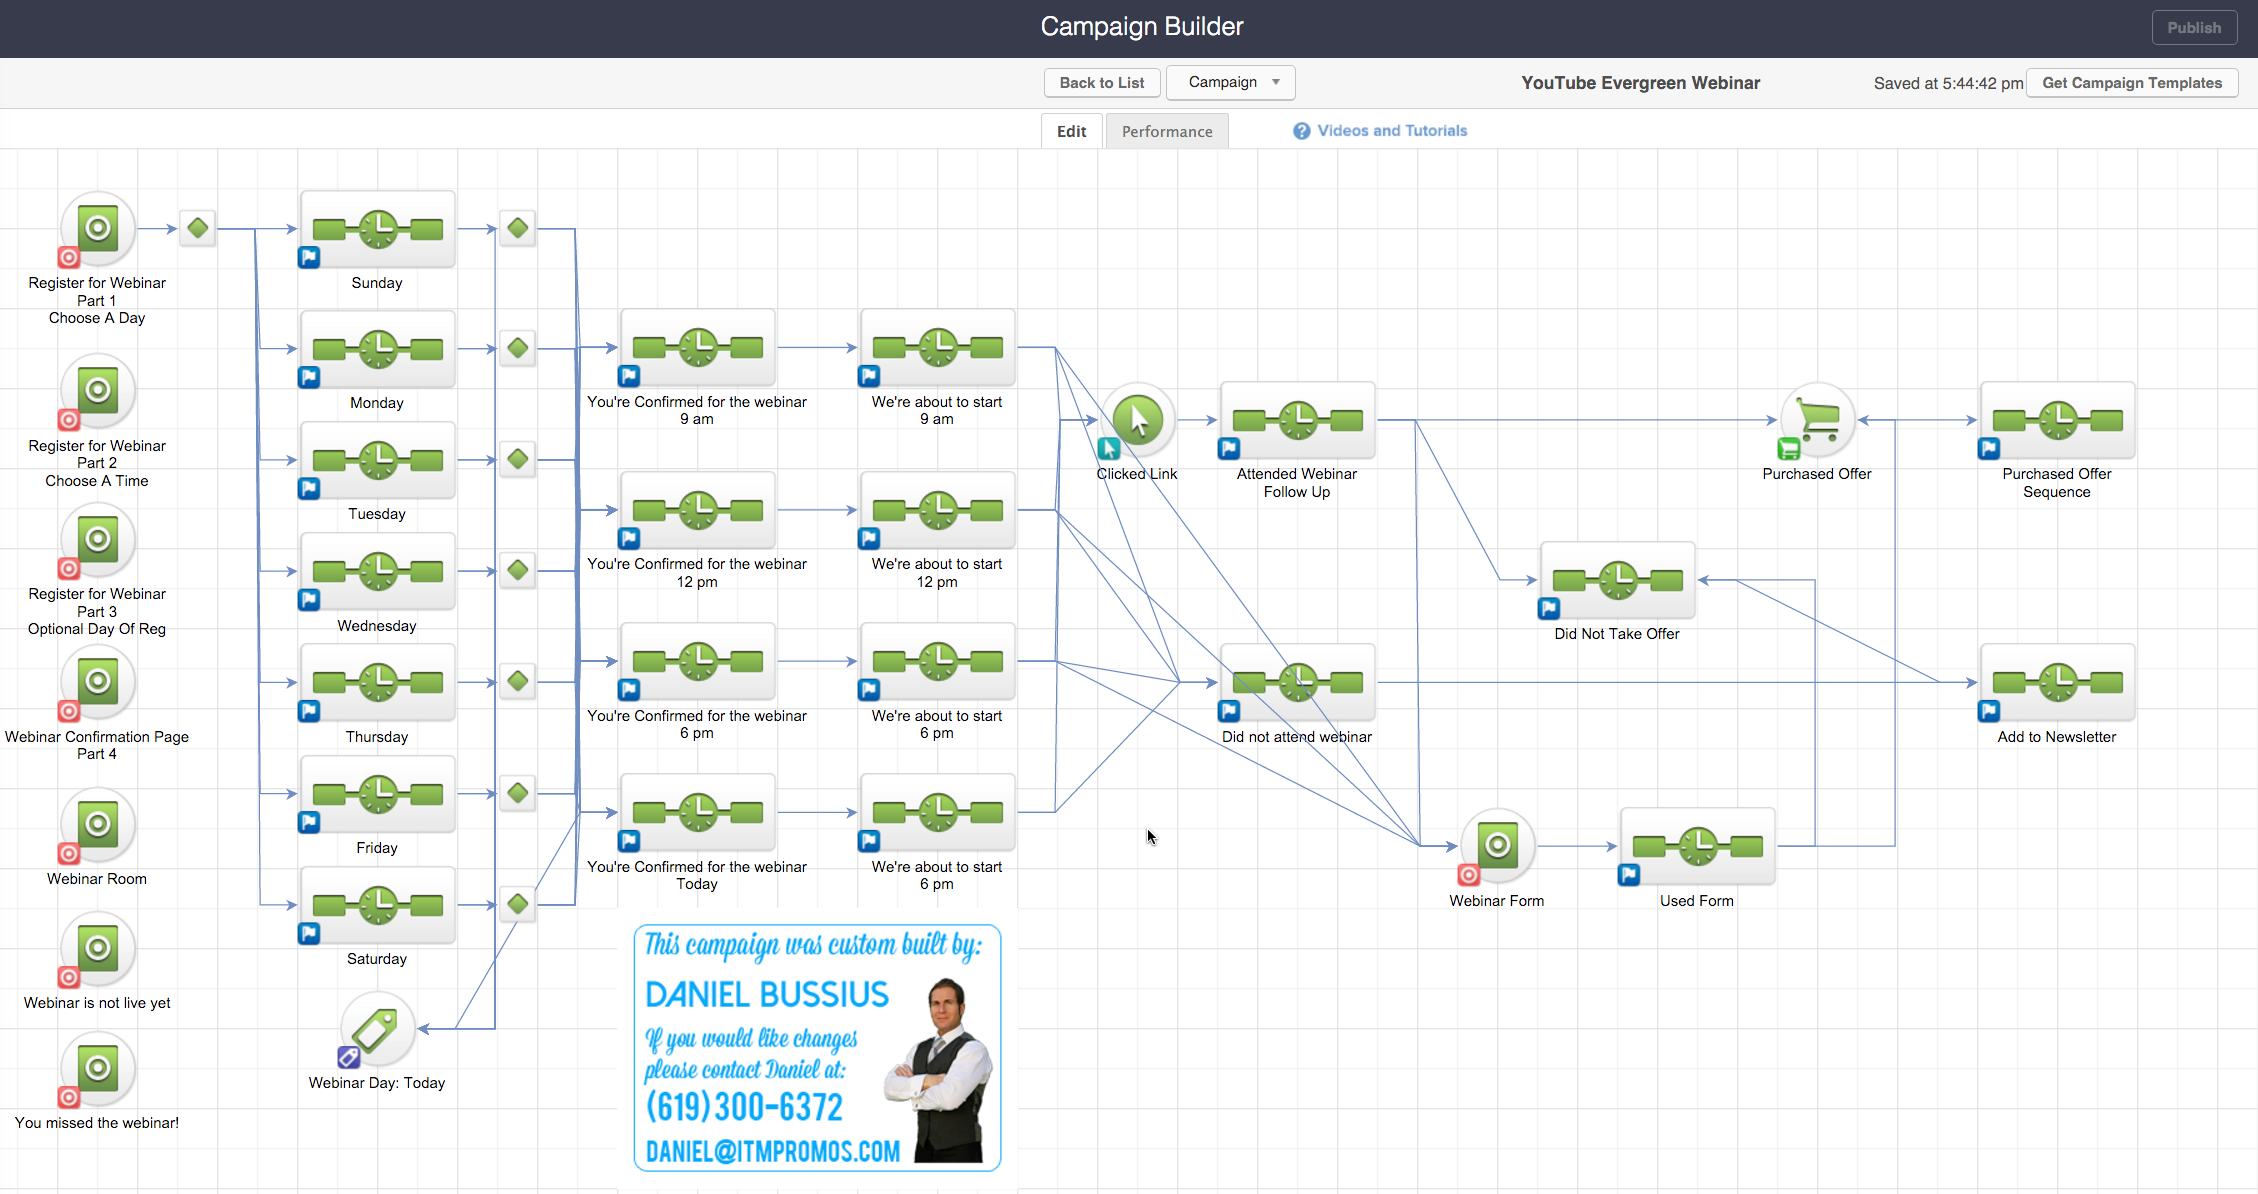
Click on this image to see a larger example of the entire YouTube Evergreen Webinar Funnel.
We are done my friend!
Woohoo!
Holy smokes that was a doozey, huh?
These tutorials take a great deal of time so if you find any value in them please share them with people you know, leave a comment below and make sure to subscribe to receive my tutorial emails.

