There is a continual struggle that every marketer and business owner faces: the click-through rates for email.
Regardless whether your email click-through rates are at 55% or at 5%, you need to read this tutorial and try this because every single email marketer faces the same challenges.
Customers' attentions spans continue to decrease, distractions continue to increase, offers and competition has increased, and this overwhelmed, over-stimulated audience is quickly becoming less and less inclined to click on your offer.
Digital Overwhelm is mounting against you. How will you survive these trends?

Inbox offers and category competition continues to increase.


Digital distractions continue to increase across all platforms.


Customers are being overwhelmed with digital content.


Customers attention spans continue to decrease.


Customers are becoming less and less inclined to click on offers.
It's a battle we all fight and, let's get real, it's not going to get easier. You need something new, something different and something exciting to get the clicks.
The AVG human attention span is 1 second shorter than a goldfish. If your marketing isn't designed to spur action within 8 seconds you're in trouble.


In this tutorial, I am going to show you how to do just that so you have a better chance to get the sale and increase your profits.
The first thing I want you to do is to grab the free guide I have created for you that will walk you through everything in this article.
Just enter your details below and we can get started.
Download Your FREE Guide and Get Access To Your Own Personalized Pictures In Email
Simply enter your details below to claim your free guide and personalized
picture software. Afterwards, you'll be brought right back to this page!
Hopefully you have grabbed your free guide that shows you how to create personalized pictures in your email. If not, enter your details in the box above.
Let's get started.
The first thing I am going to show you is this short 6-minute video I created that walks you through the entire process.
How-To Video: Create Personalized Pictures In Your Emails
Take a moment to watch the video above and then follow the steps provided below.
Step One: Grab Your Customized Picture Software
The first thing I need you to do is to claim your own access of this amazing software. It is incredibly easy to use and enables you to create custom copy over any type of image embedded in an email. You can even upload your own images, including your own face.
Cool, yes? Heck yeah! Click the button below or simply click this link here.
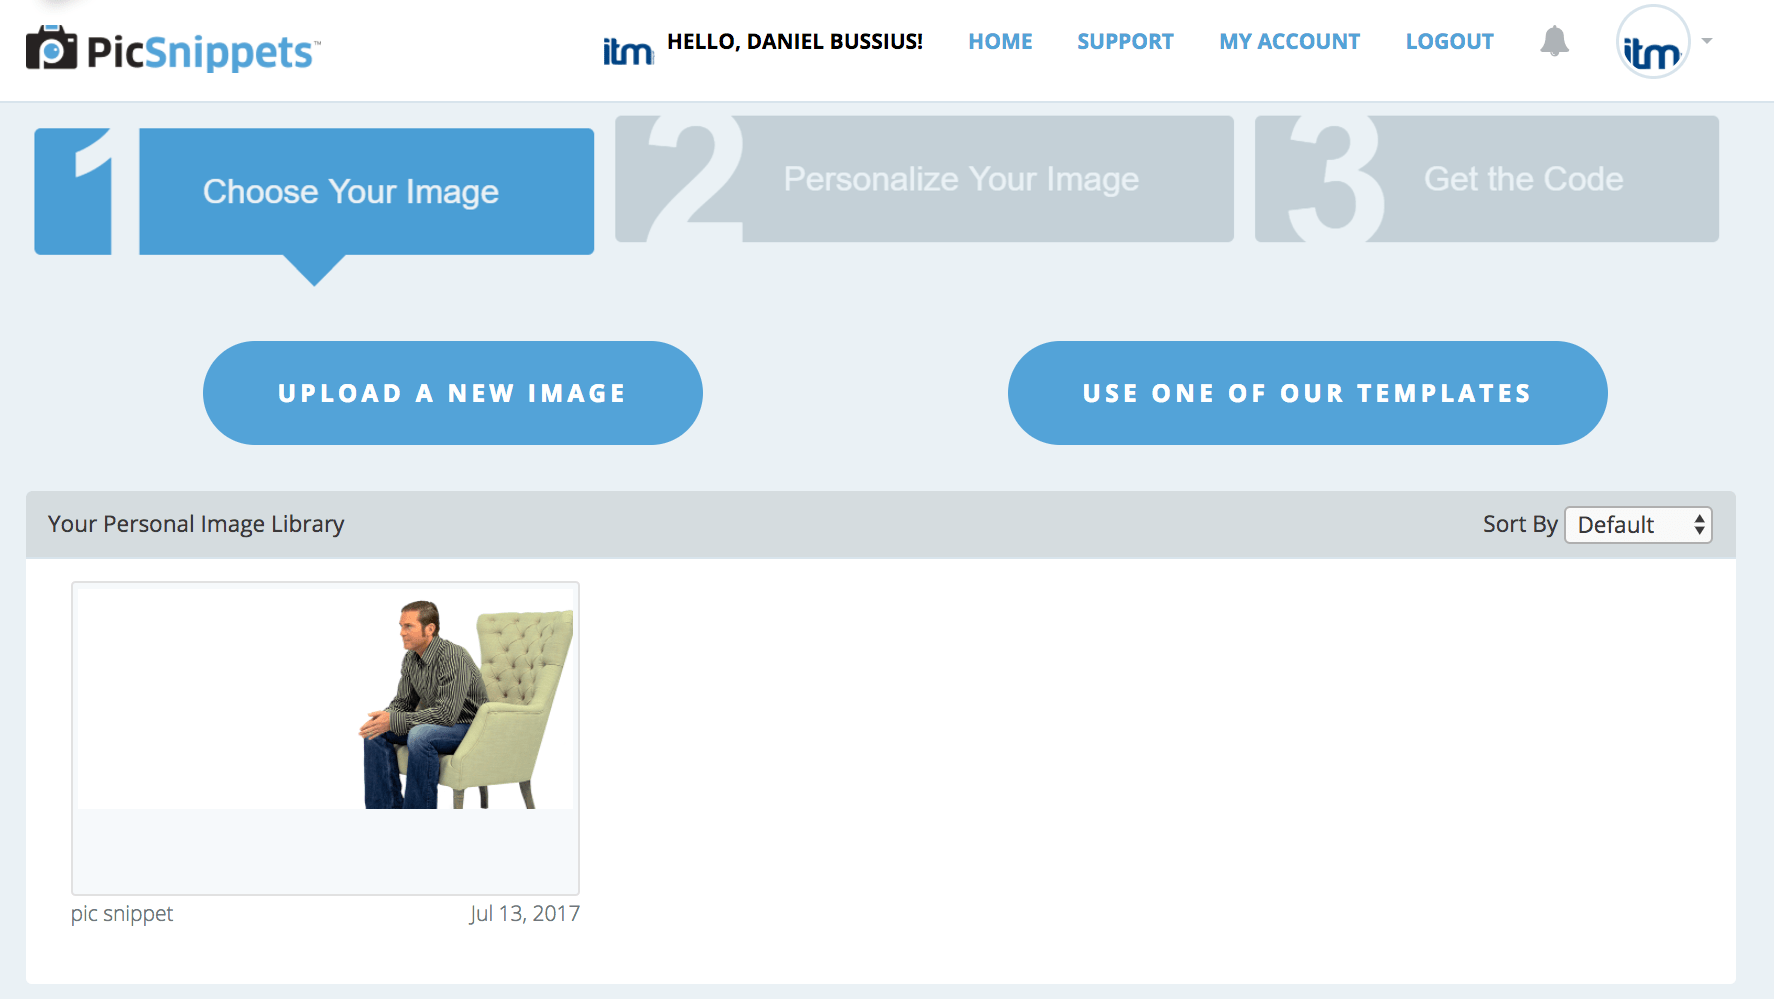
Step Two: Choose The Image You Want To Use
Now that you have the software, let's get started by making sure you are logged in.
Then, either choose from one of their royalty-free images or upload one of your own.


Click image above to zoom in.
Step Three: Add The Custom Text Over The Image
Crazy simple so far, yes? Good news, it's this easy throughout the entire process!
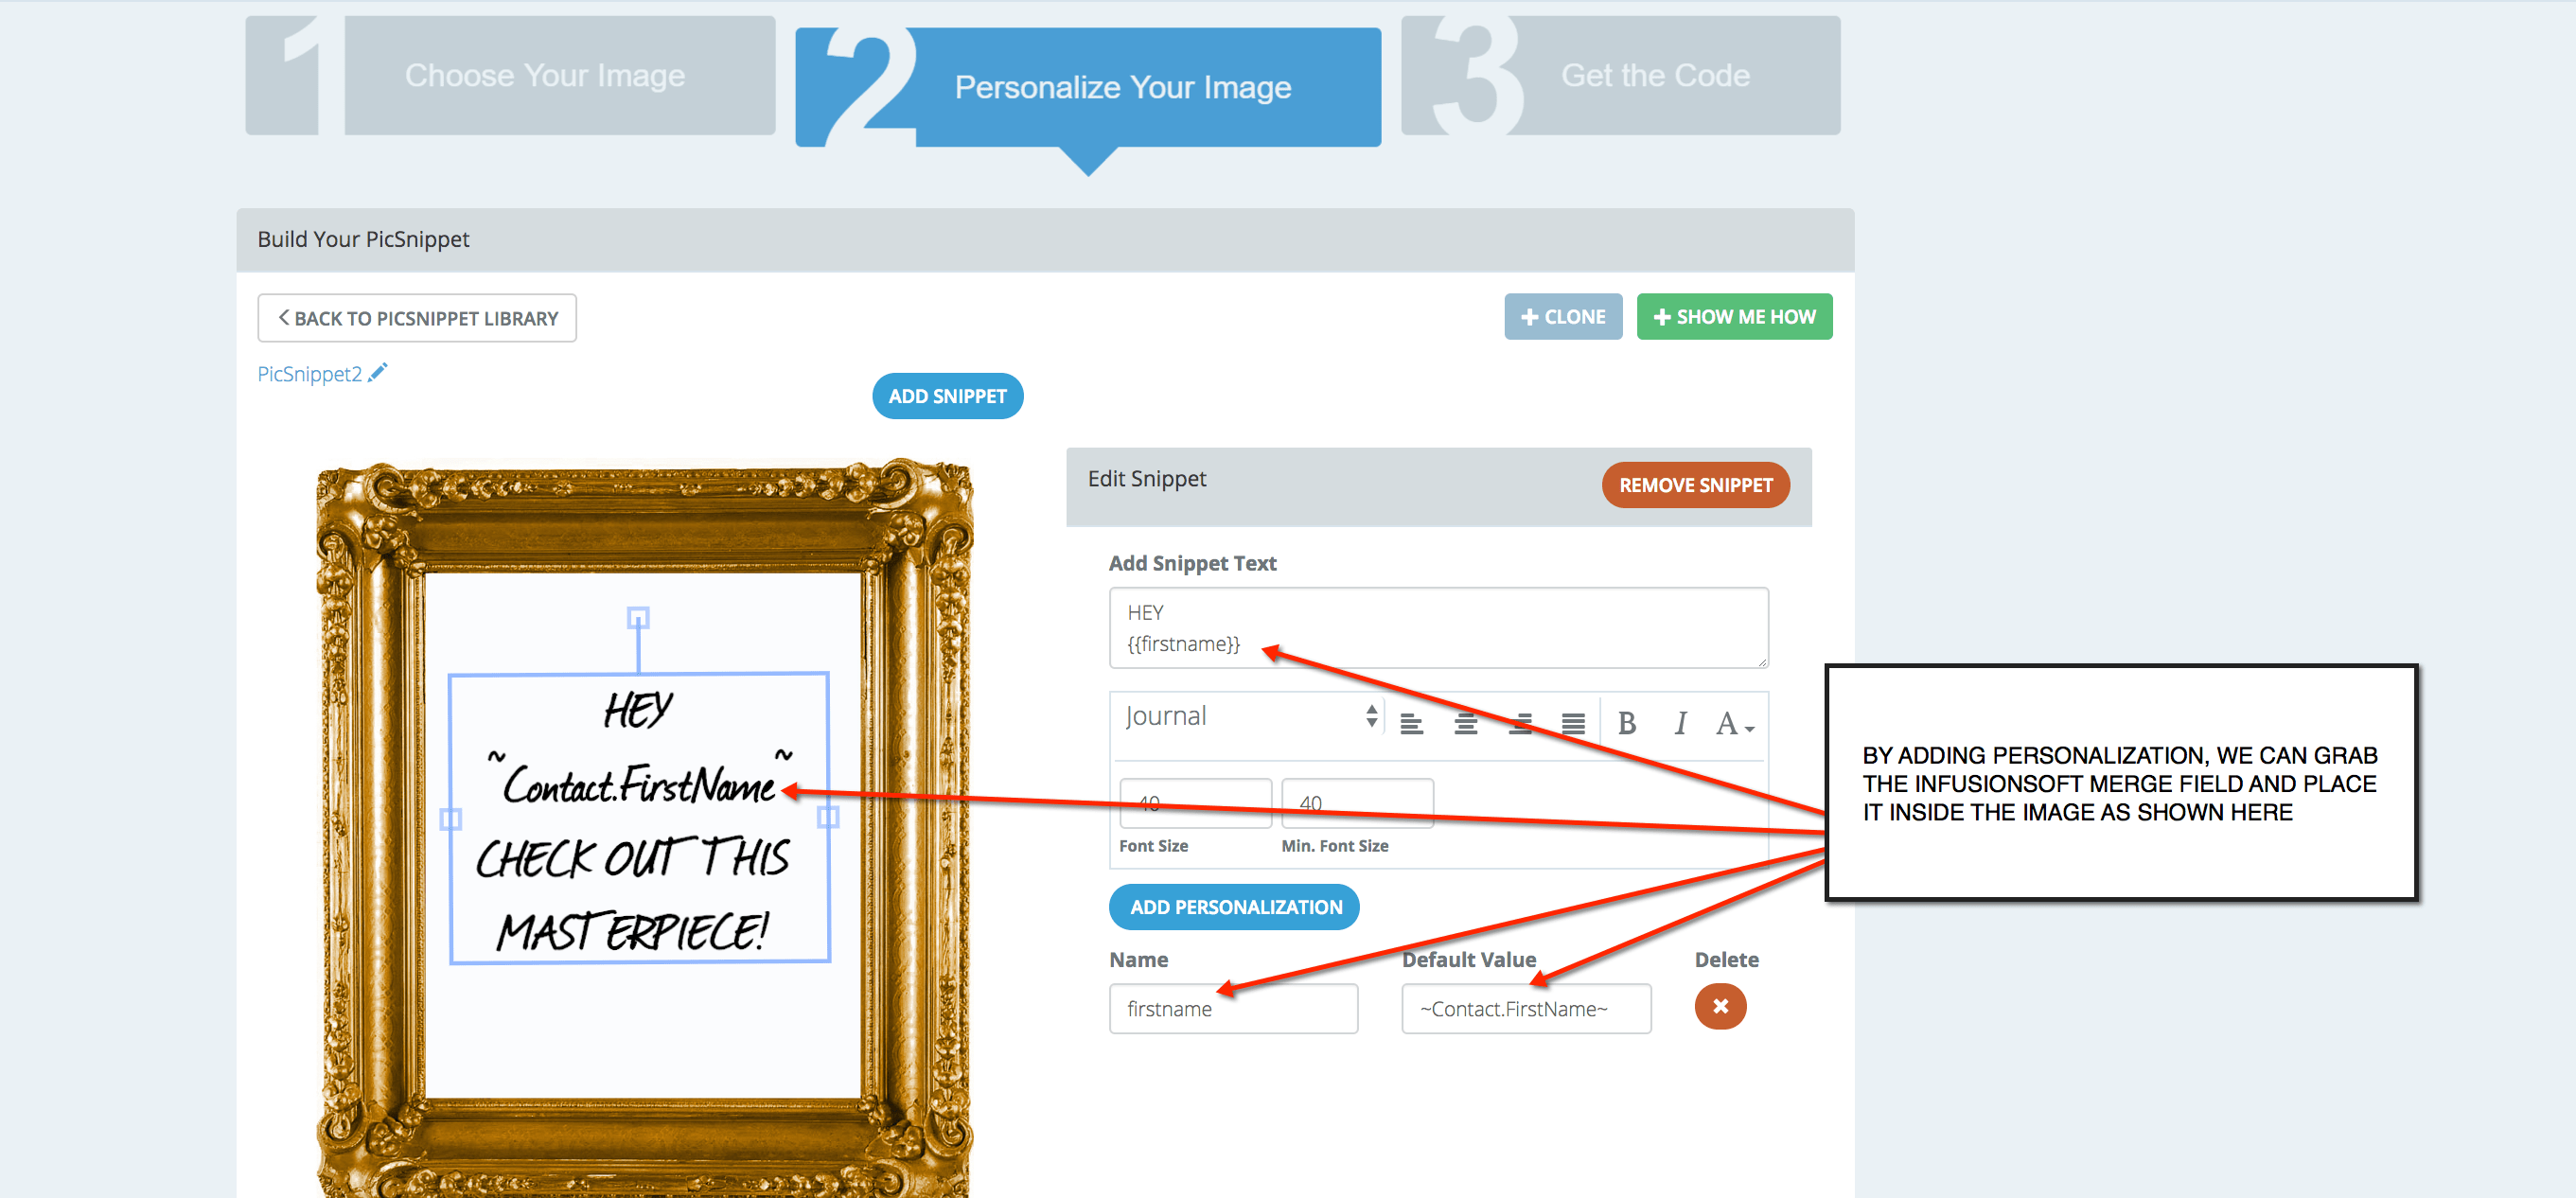
Next, we are going to personalize the image by adding a snippet. When you click on "Add Snippet," you will see a text box appear. You now have the power to move the box around, change the font, size and styling.
So go ahead and write your brilliant call to action now. I'll wait here while you do this part...
Now that you've written your copy, we'll want to customize this by adding in something like the person's first name.
Note: You can choose all kinds of custom copy to embed, but we are going to do first name for this tutorial.
Adding in the first name field
You will accomplish adding in the first name by clicking the button that says "Add Personalization."
Once you click on that, you'll see the two fields appear. The first is "Name," which you will name the parameter. For us, we are going to write "firstname."
Next, is the "Default Value." This is where we are going to input the merge field from your respective CRM. For Infusionsoft, we are going to use the first name field value which the field value is: ~Contact.FirstName~
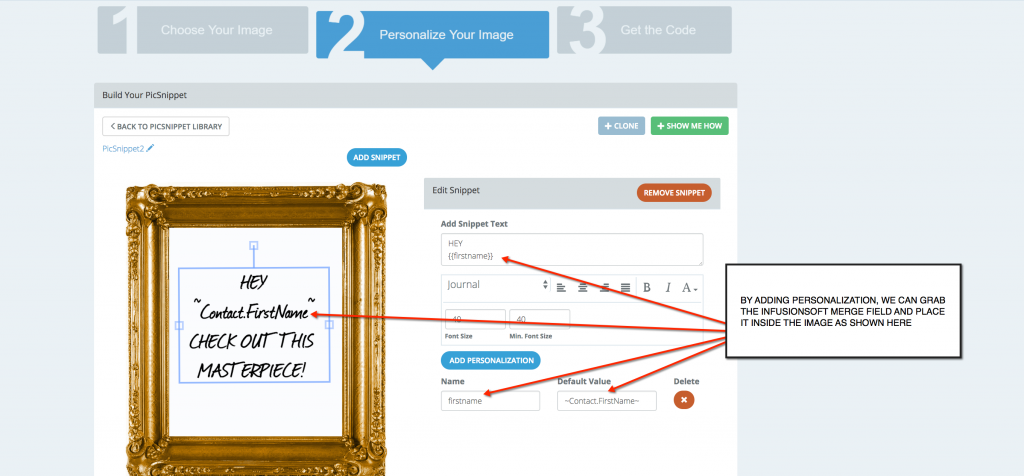

Click image above to zoom in.


DID YOU KNOW?
I am an Infusionsoft Certified Partner. If you want to learn more about Infusionsoft or need an award-winning Certified Expert working with you, please schedule your free consult with me by clicking here.
Step Four: Grab The Embed Code
Smooth sailing so far. Don't you love easy?
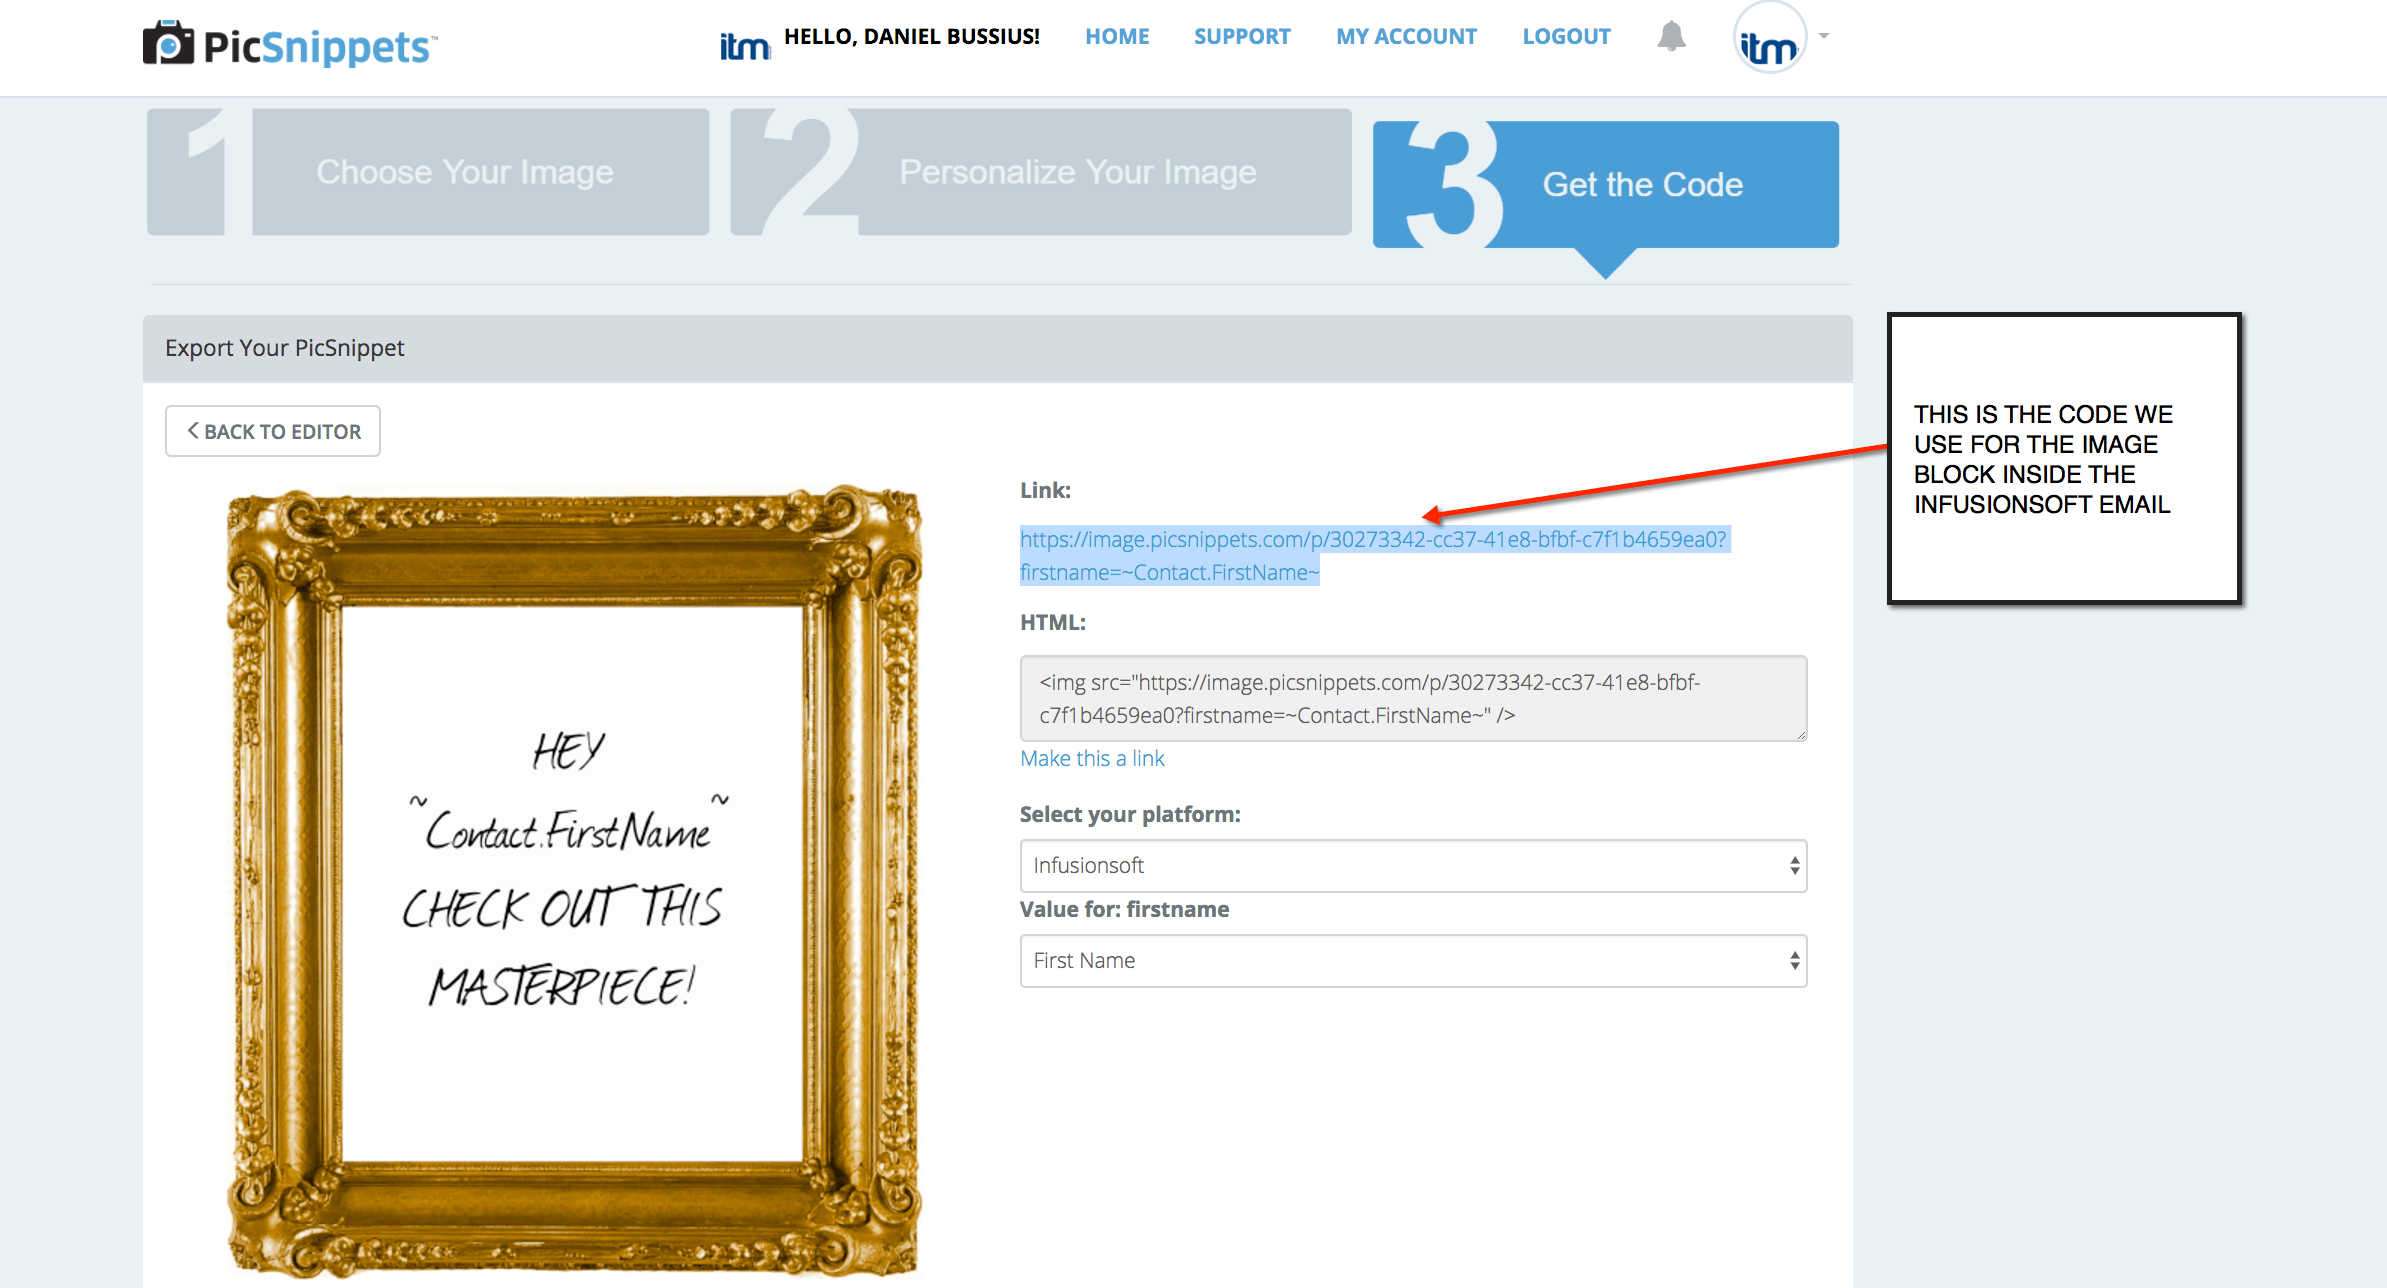
Next up we are going to select our CRM by clicking on the "Select Your Platform" dropdown and choosing the respective automation system you use.
Then, you'll match the field value by using the drop down in "Value for firstname" (our custom field we chose) and matching that field to our automation system's matching field.
Finally, we grab the embed code as pictured below.
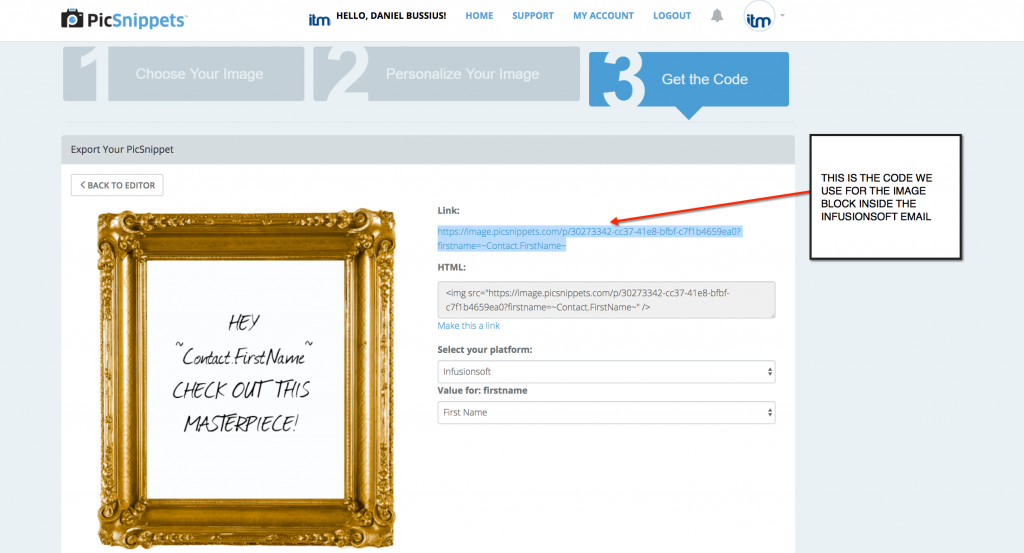

Click image above to zoom in.
Step Five: Embed The Code In Your Email
We are now ready to take the copied embed code and head over to the email we have waiting for us so we can drop it in there.
I happen to be an Infusionsoft Certified Partner, so I am showing this example inside Infusionsoft; however, you can use any system that works with the software.
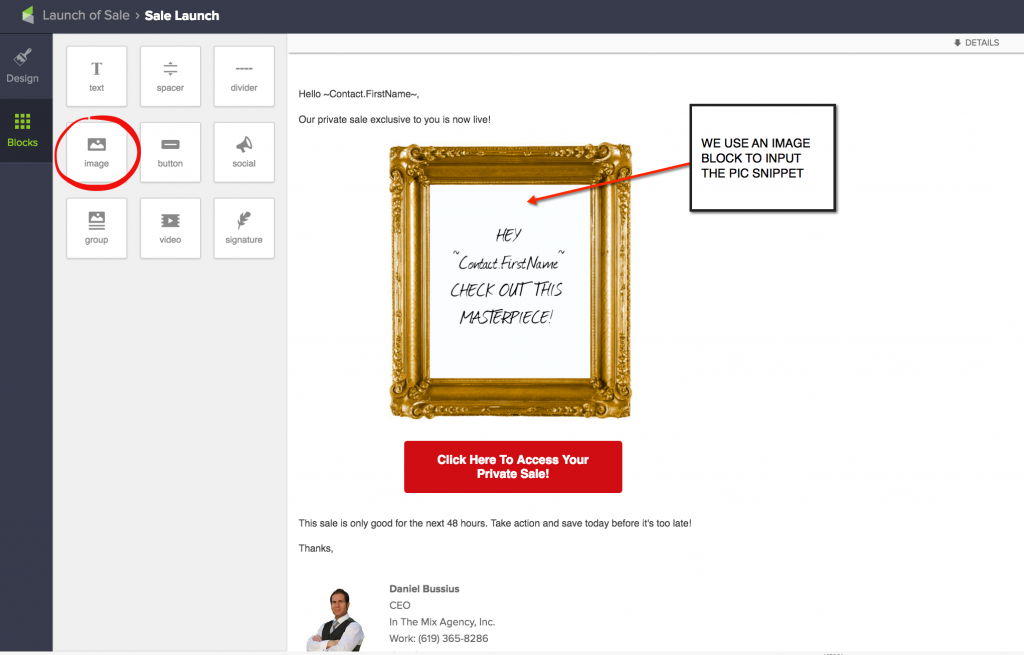

Click image above to zoom in.
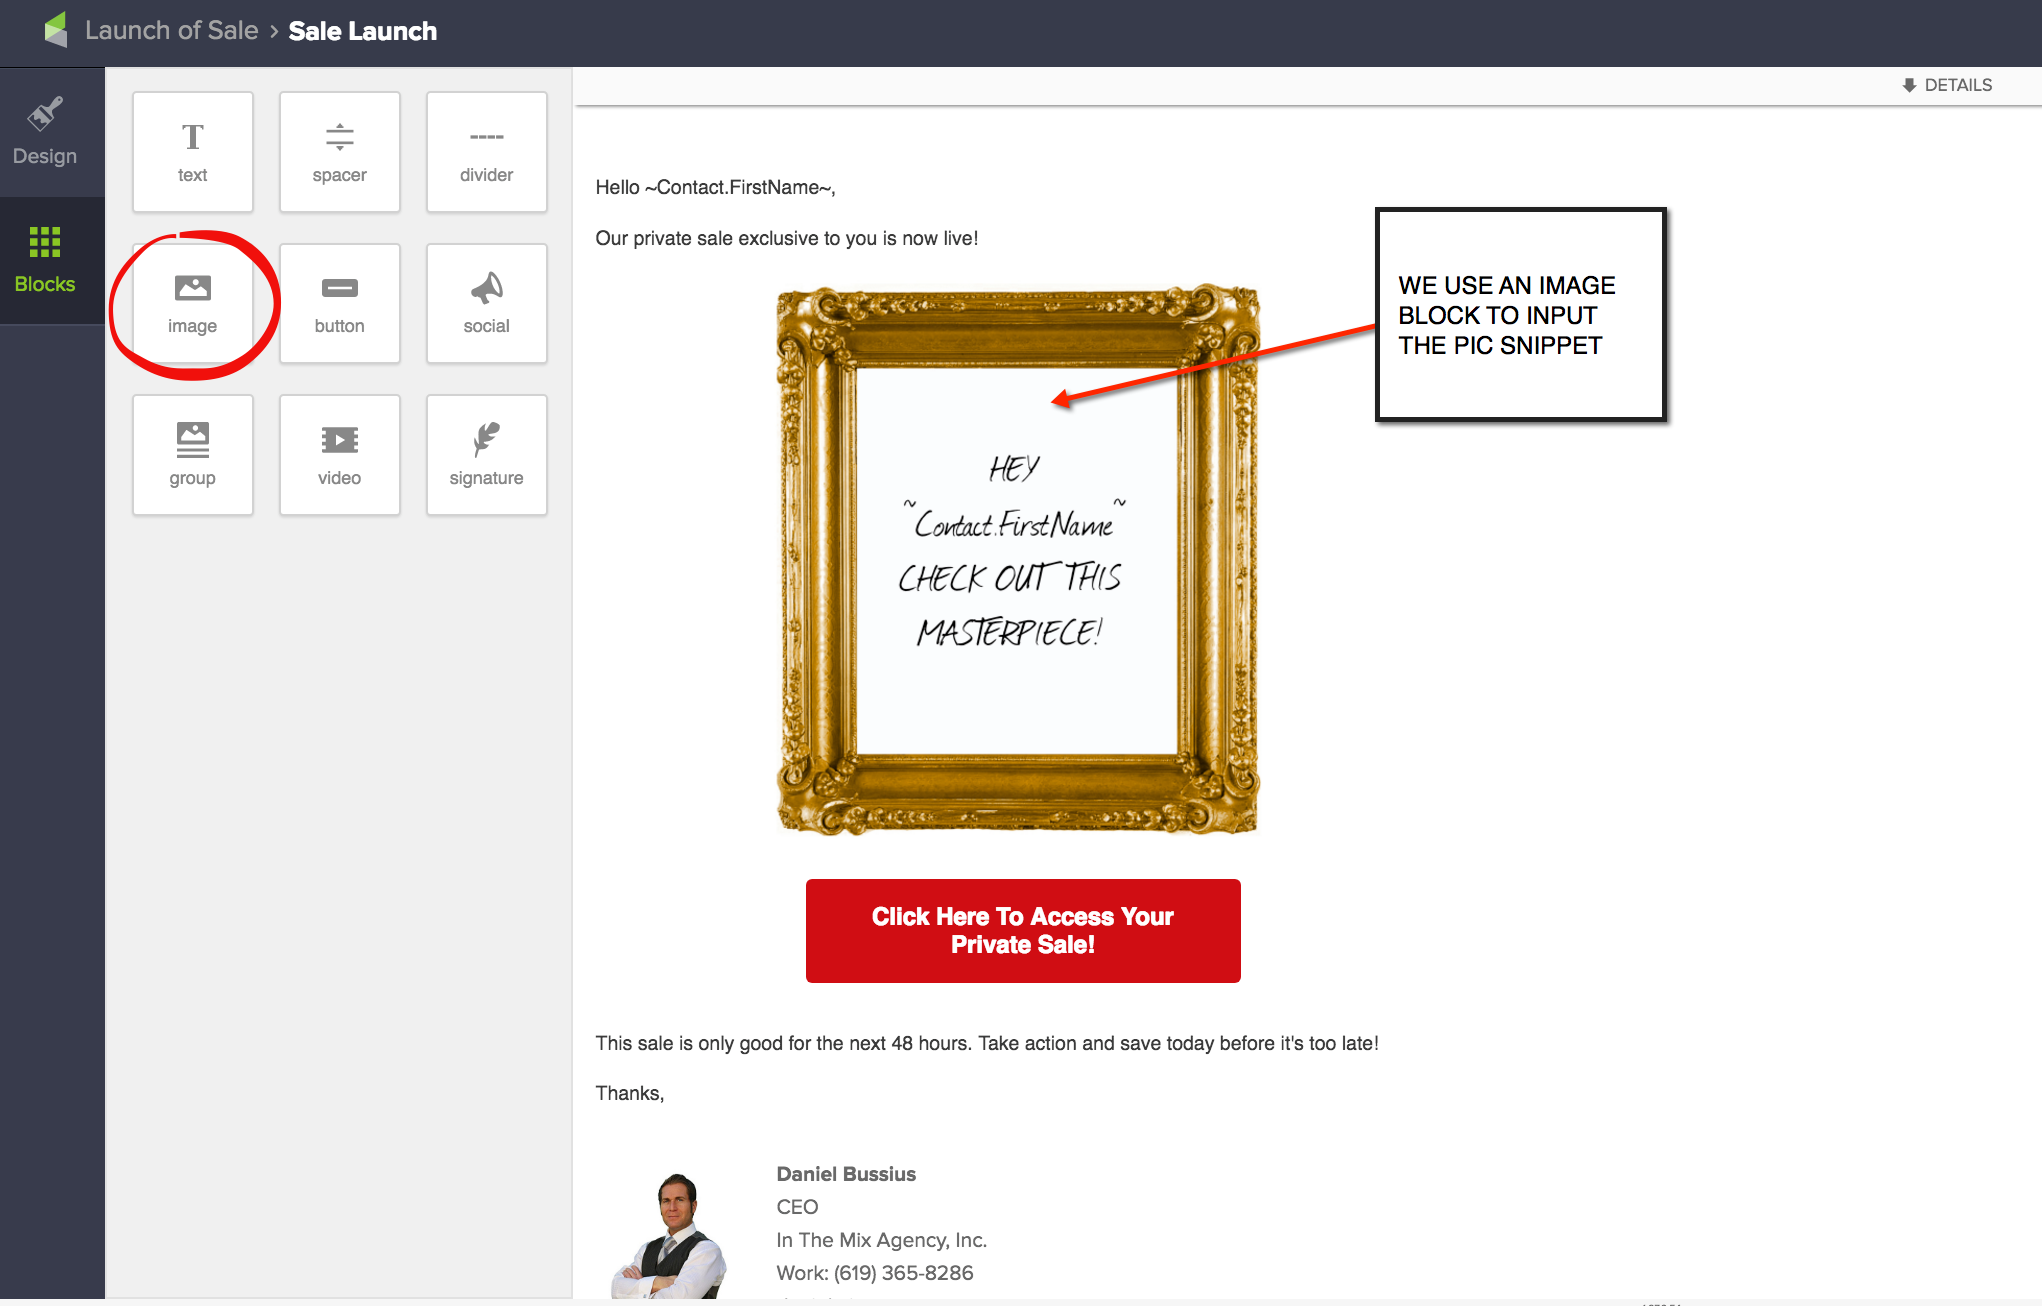
Inside our email builder we are going to grab an Image Snippet and drag it into our email canvas.
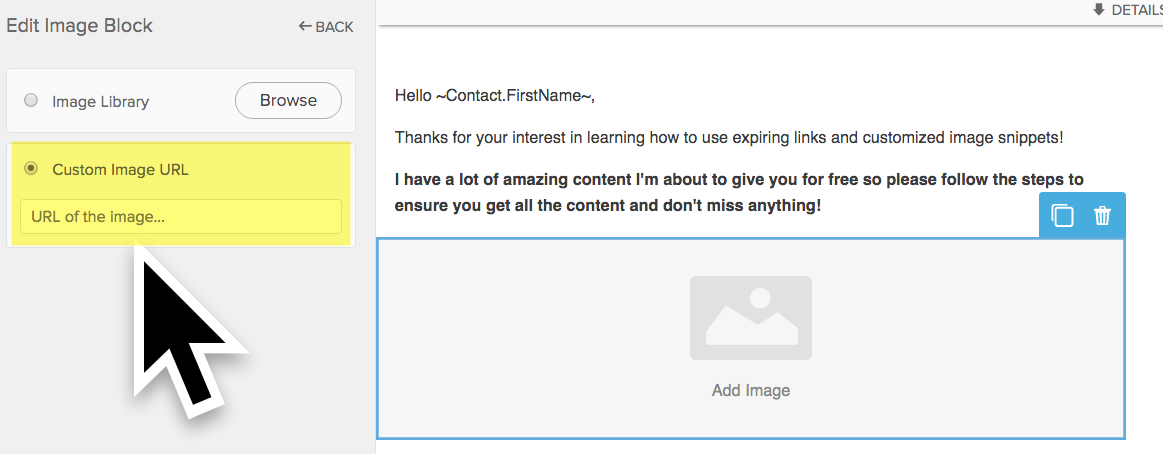
Once placed in the email, we are going to make sure we are clicked into the image so we can see the "Edit Image Block" section. We'll now choose the "Custom Image URL" and paste in the code we grabbed from the software (shown below).


Click image above to zoom in.
That's it! You are ready to send your email now. Before you go, make sure to grab your free How-To guide below so you always know how to do this!
Step Six: Grab Your Free How-To PDF Guide
Download Your FREE Guide and Get Access To Your Own Personalized Pictures In Email
Simply enter your details below to claim your free guide and personalized
picture software. Afterwards, you'll be brought right back to this page!


