In today's age of digital marketing and developing trust with your consumer base, it's imperative that you stay true to your word on your sale terms.
Failure to do so jeopardizes the consumer's trust and decreases the likelihood of purchases, referrals and consumer satisfaction with your brand.
Today I am going to teach you how to build a dynamic sale with links inside the emails that can dynamically change using the most powerful CRM system for small business owners: Infusionsoft.
Let's start by making sure that you grab your free PDF of this tutorial. You'll also get a bonus tutorial teaching you how to embed pictures with custom copy written on the pictures embedded in your email!
Download Your FREE Guide and Get A Bonus Tutorial To Create Personalized Images In Email!
Enter your details below and claim your free PDF of this tutorial showing you how to create dynamically changing sales links.
You'll also get a bonus tutorial teaching you how to embed pictures with custom copy written on the pictures embedded in your email!
Why You Want To Use Dynamic Sales Links In Your Emails
Using a dynamic sales link inside your emails gives you the power to automatically change links and/or content at precisely the time you wish.
The power behind this is when you state you are offering a holiday sale that ends at a specific date and specific time.

In a standard email, you'd have links in the emails providing the promo code or the discounted product link.
The problem is, when the sale is over, that email recipient still has the promo code and/or the discounted product link. This enables them to take advantage of your sale even after you stated the sale is over.
The only way for you to stop this is by manually removing the product from your shopping cart or manually disabling that promo code.
Either way, this is not ideal and provides a poor customer experience. PLUS, we can automate all of this for you!
(Did you know? I am an Infusionsoft Certified Partner. If you want to learn more about Infusionsoft or need an award-winning Certified Expert in the CRM, please schedule your free consult with me by clicking here).
Here's how we can accomplish this in a few simple steps:
Hopefully, you've downloaded your free guide that teaches you these steps. Now, watch this short video that walks you step-by-step through this easy process!
The Simple Dynamic Link Campaign How-To Video
Click to watch this tutorial teaching you how to create dynamic sales links in emails.
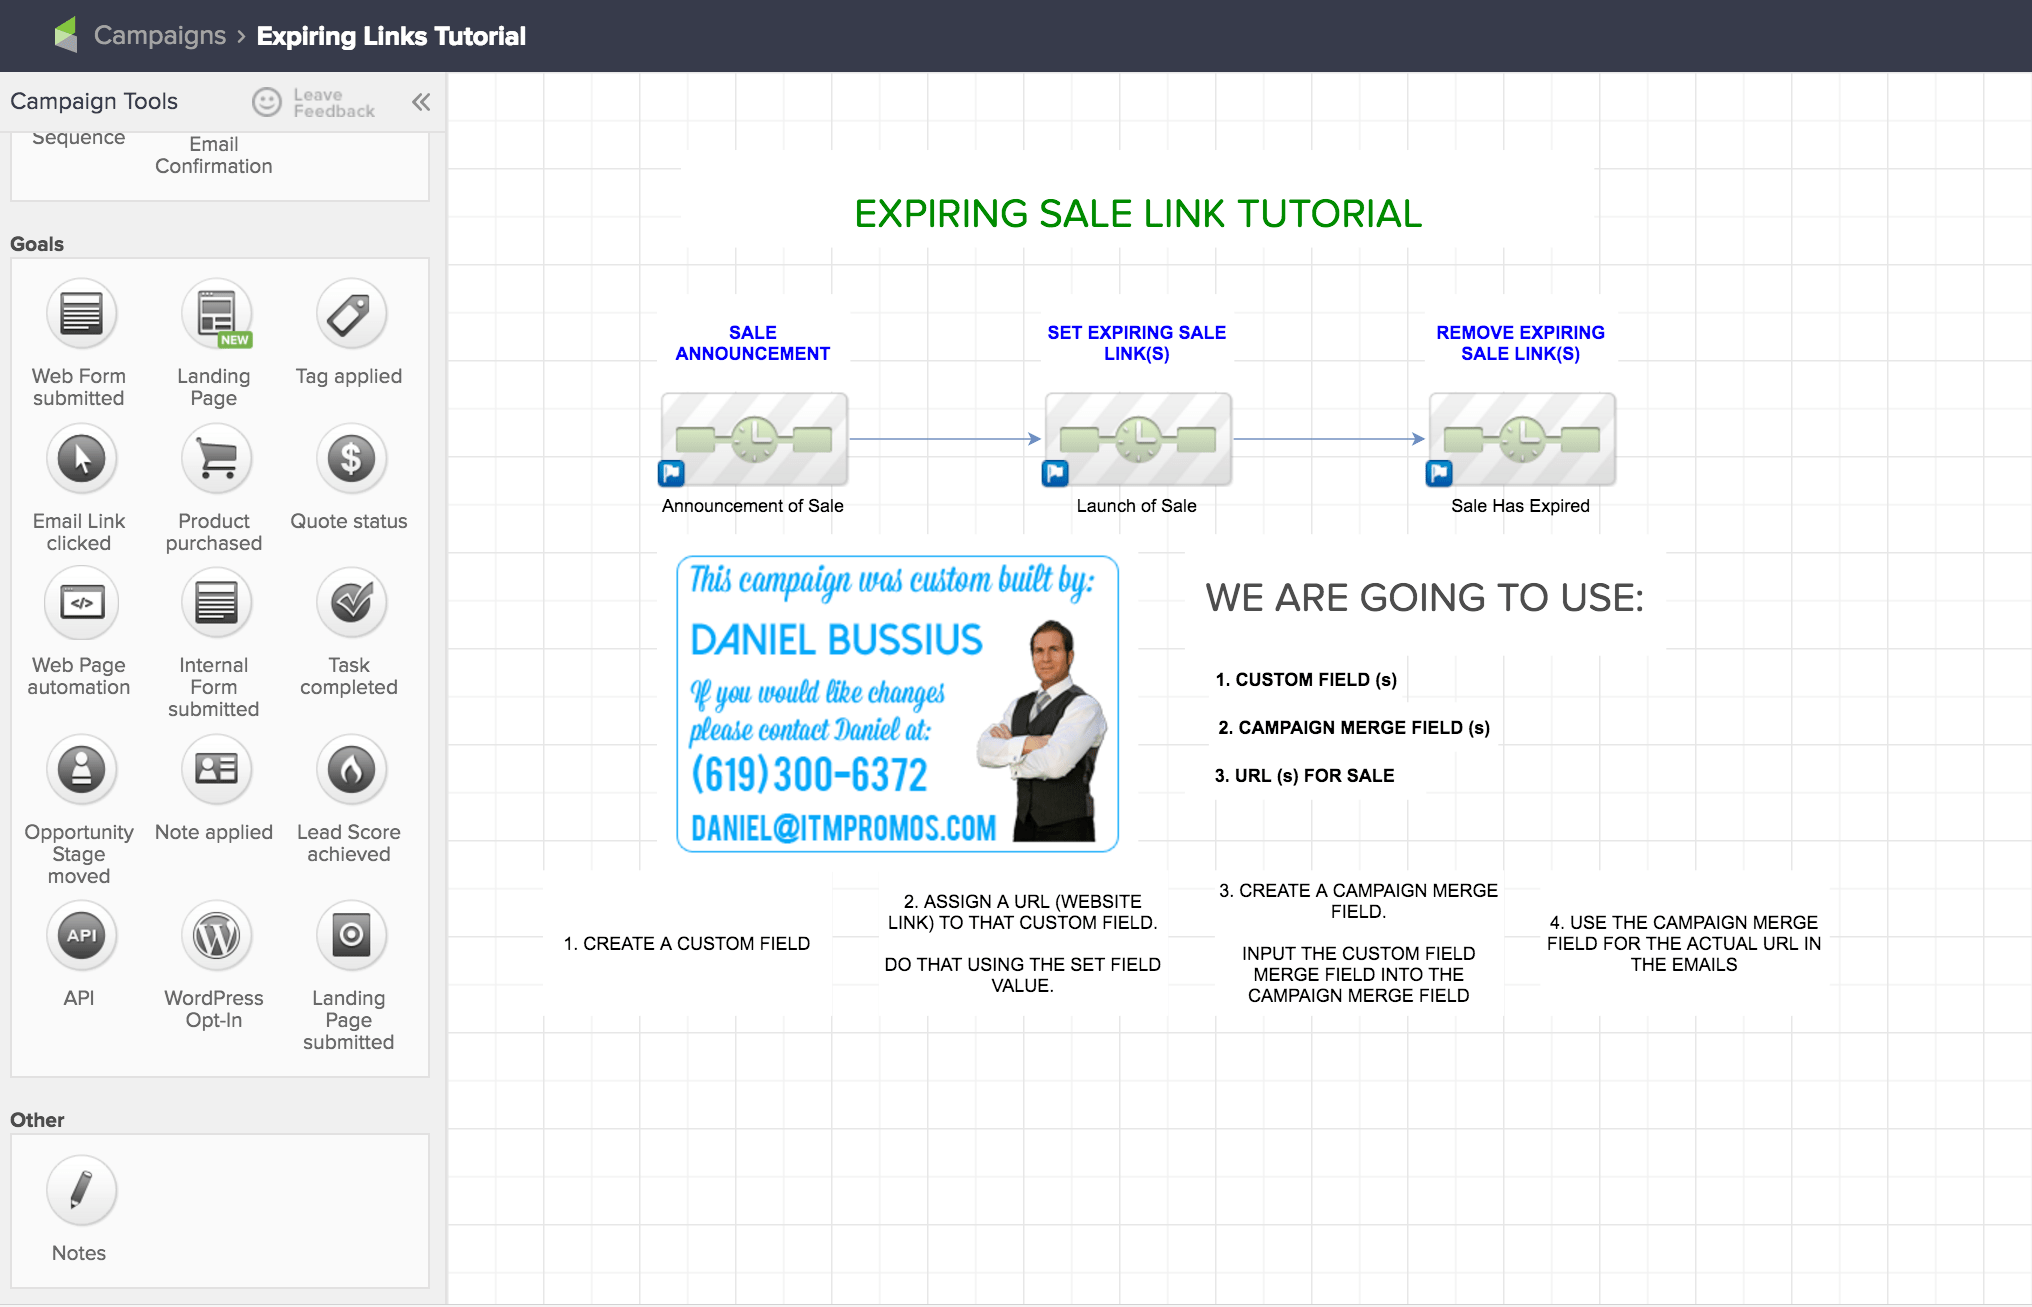
Below you will see a simplified campaign I designed to show you exactly how you'll want to build your Infusionsoft campaign:

Click the image above to zoom in.
You will notice that I have built 3 campaign sequences.
- The first campaign step is the sale announcement (nothing happens in these emails besides you making your list aware of the upcoming sale).
- The second campaign sequence is where we set the field value that hosts the product link (or promo code, if you use promo codes).
- The third campaign sequence is built to visually show you how to change out the sales link so we can remove the links in all the previous emails.
Step One:
Create Your Custom Field
To start off on this easy tutorial, we are going to create a custom field inside of Infusionsoft. If you already have a custom field created that you wish to use, you can skip this first step.
To begin:
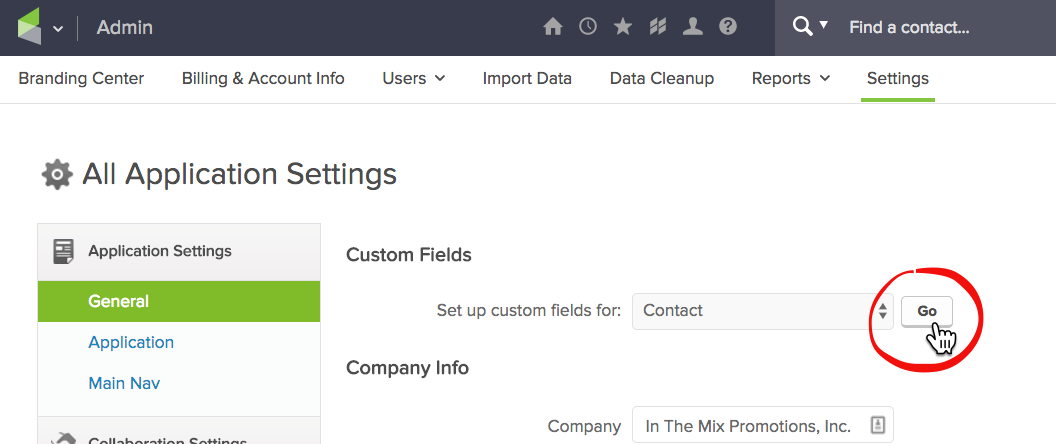
Hover your mouse over the Infusionsoft Banner to see the drop down menu, then go to the "Admin" tab and select "Settings."
Admin>Settings.
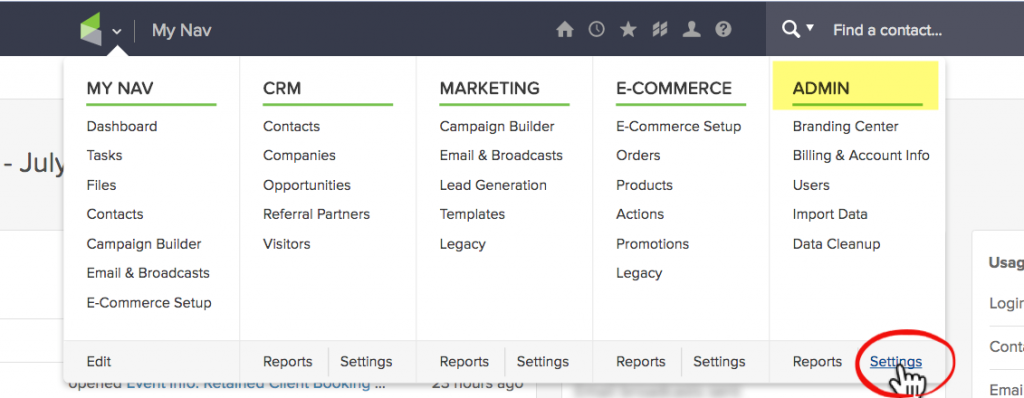
Click the image above to zoom in.
Next,
From the "General" section, click on "Go" as shown below.

Click the image above to zoom in.
Lastly,
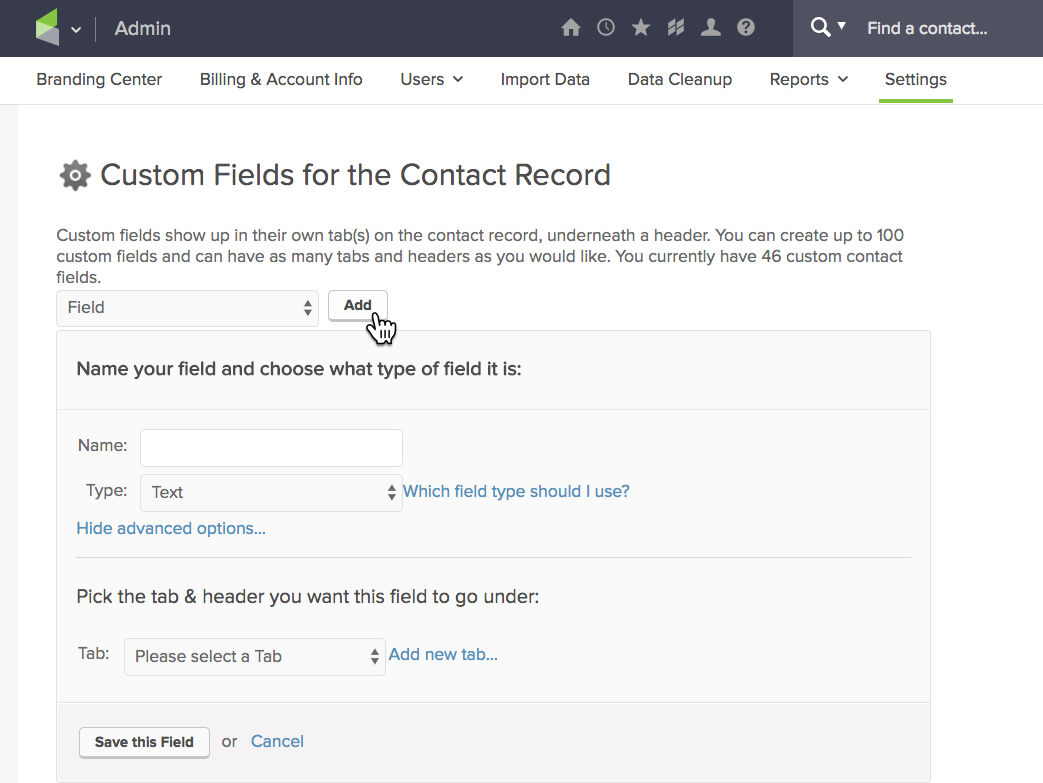
You will click "Add" for the "Field" choice. You then will want to properly name your custom field. You will keep the choice "Text" selected.
This part is optional: you can choose where this custom field is organized by clicking on "Advanced Options." After you are finished, click "Save This Field."
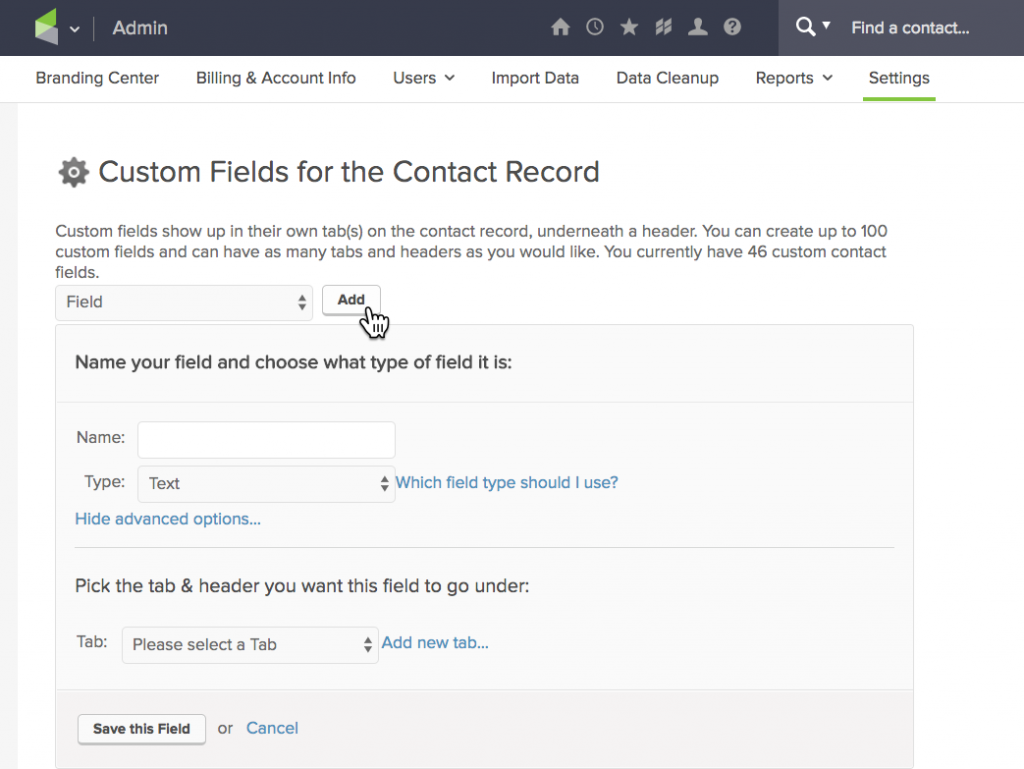
Click the image above to zoom in.
Step Two:
Set the Field Value In Your Custom Field
Assuming you have created the same 3 sequences as shown in Step One, we are now going to open up the sequence named "Launch of the Sale."
If, for any reason, you have not built your 3 sequences, please quickly do so, and name them as I have. Then open the middle one named "Launch Of Sale."
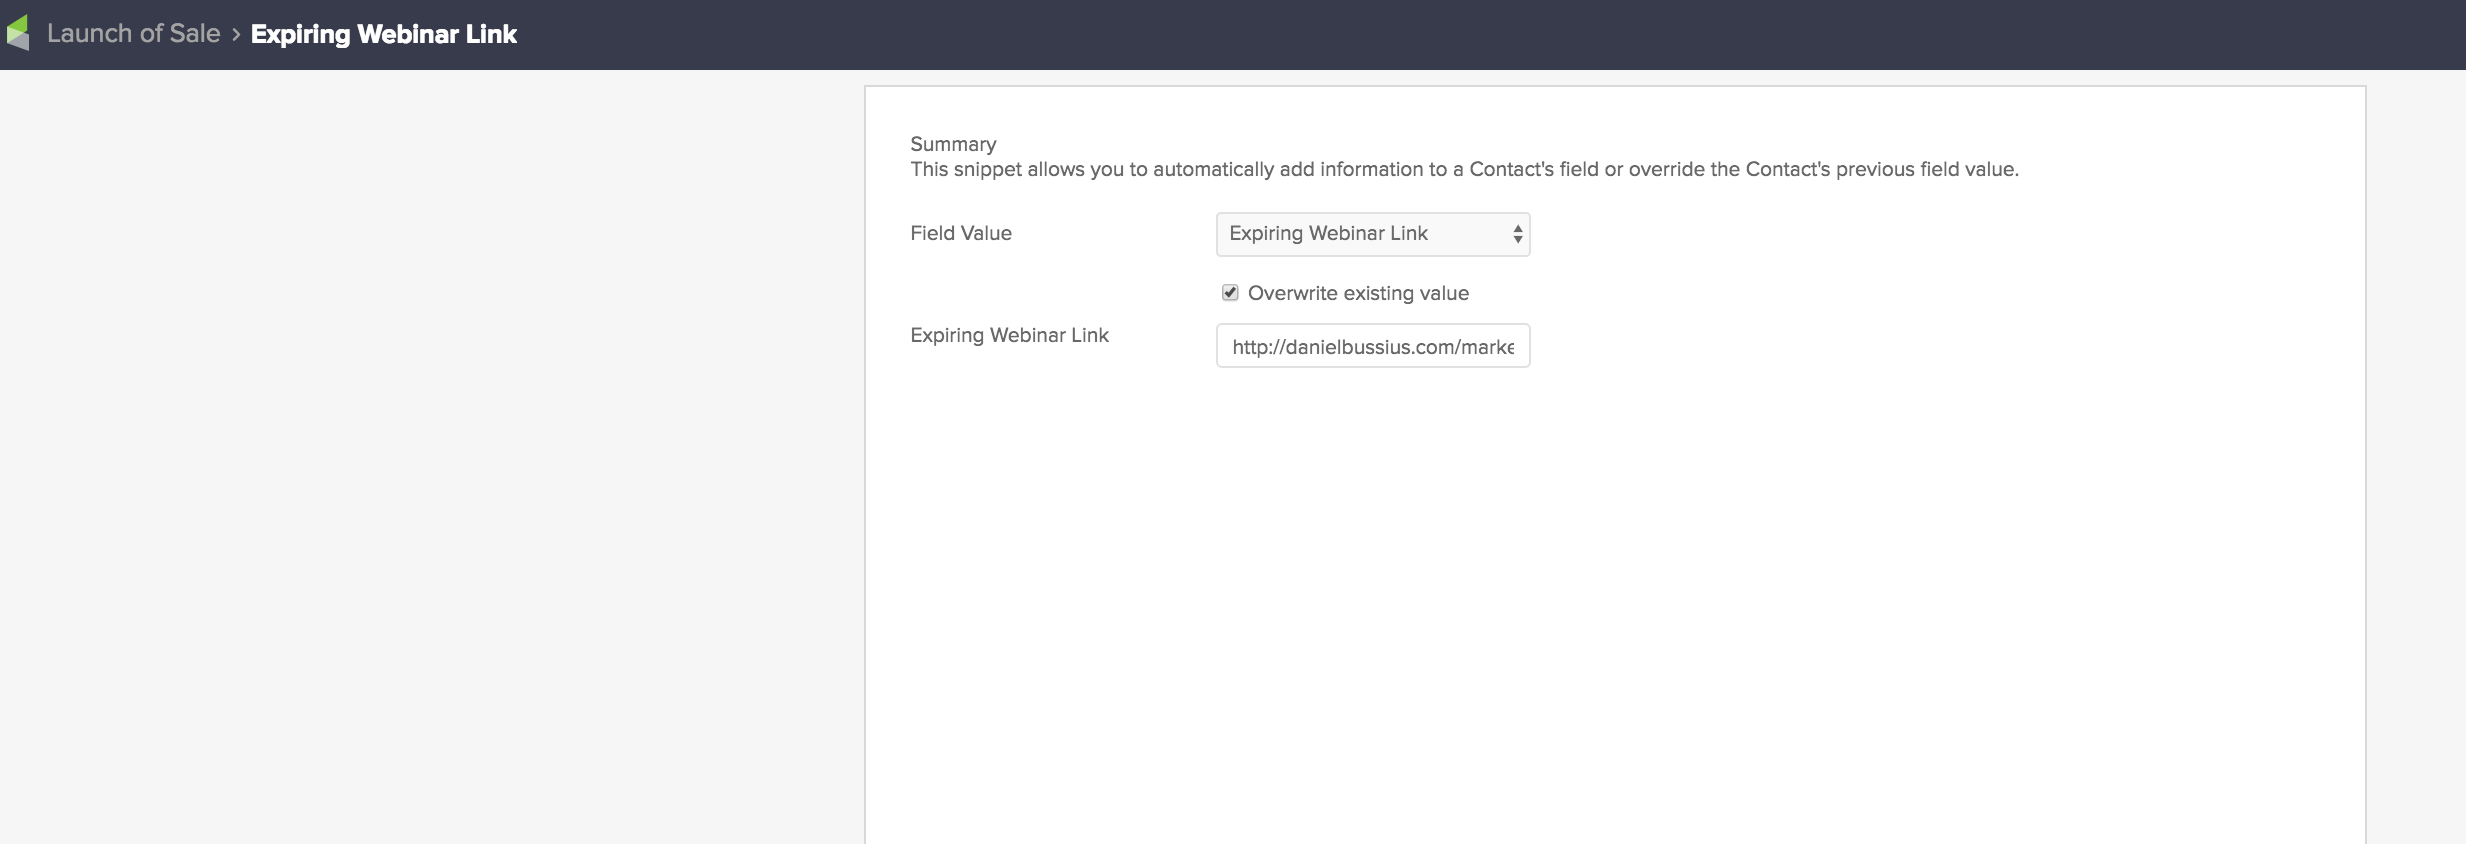
Inside this sequence, you will add a "Set Field Value" Widget after the "Start" widget.

Click the image above to zoom in.
Once we open up that "Set Field Value" widget, you will get a drop-down option to select the custom field that you have chosen for this campaign.
Once you have selected the correct custom field, input the product sales link you want to use for your sale as shown below.

Click the image above to zoom in.
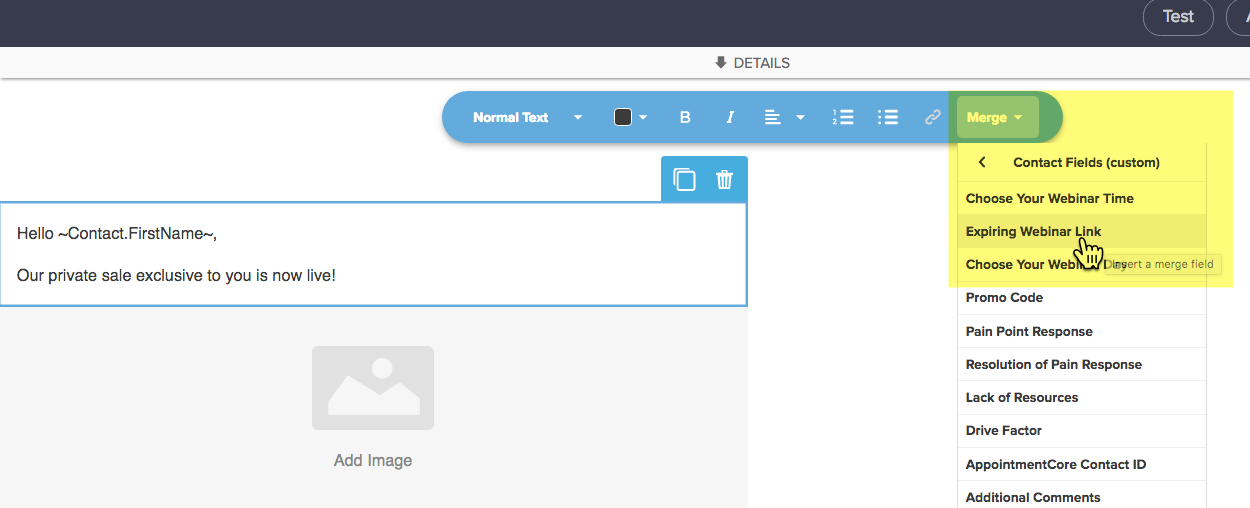
We are now going to jump into an email so we can grab the Custom Field merge link.
Inside your campaign sequence for "Launch Of Sale," add an email and then open it up. Once you have done so, click into the email and then, in the editor bar, click on "Merge" and scroll to your newly created Custom Field and select it.

Click the image above to zoom in.
You will now see the Custom Field merge link which will look something like what is pictured below. Whatever you named your Custom Field should reflect the link as shown in my example.
Simply highlight the entire link with the ~ ~ and cut and copy it.

Click the image above to zoom in.
With the value being copied and removed from the email, go back to the main Campaign Builder screen.
Step Three:
Place the Custom Field Into The Campaign Merge Field
We are now going to create a Campaign Merge Field.
OK, get ready to pay attention, as this is the only part of this training that may make your head spin!
The Campaign Merge Field we are going to create is going to house the Custom Field merge field. As you already have done (and know), the Custom Field is what houses the sales link. The new Campaign Merge Field will house the Custom Field link.
So, it is basically a link, within a link, within a link.
Don't fret if your head is still spinning, you don't have to understand this for it to work. Kind of like when you flip on a light switch or turn on your car ... there's a bunch of stuff happening but you don't understand it all. You just know it works.
Let's quickly cover why I am telling you to do this.
The Campaign Merge Field is similar to a Custom Field but necessary that we use this merge field rather than the custom field as the link in our emails. The reason for this is that the new Infusionsoft email builder is not reliable when using direct custom field links.
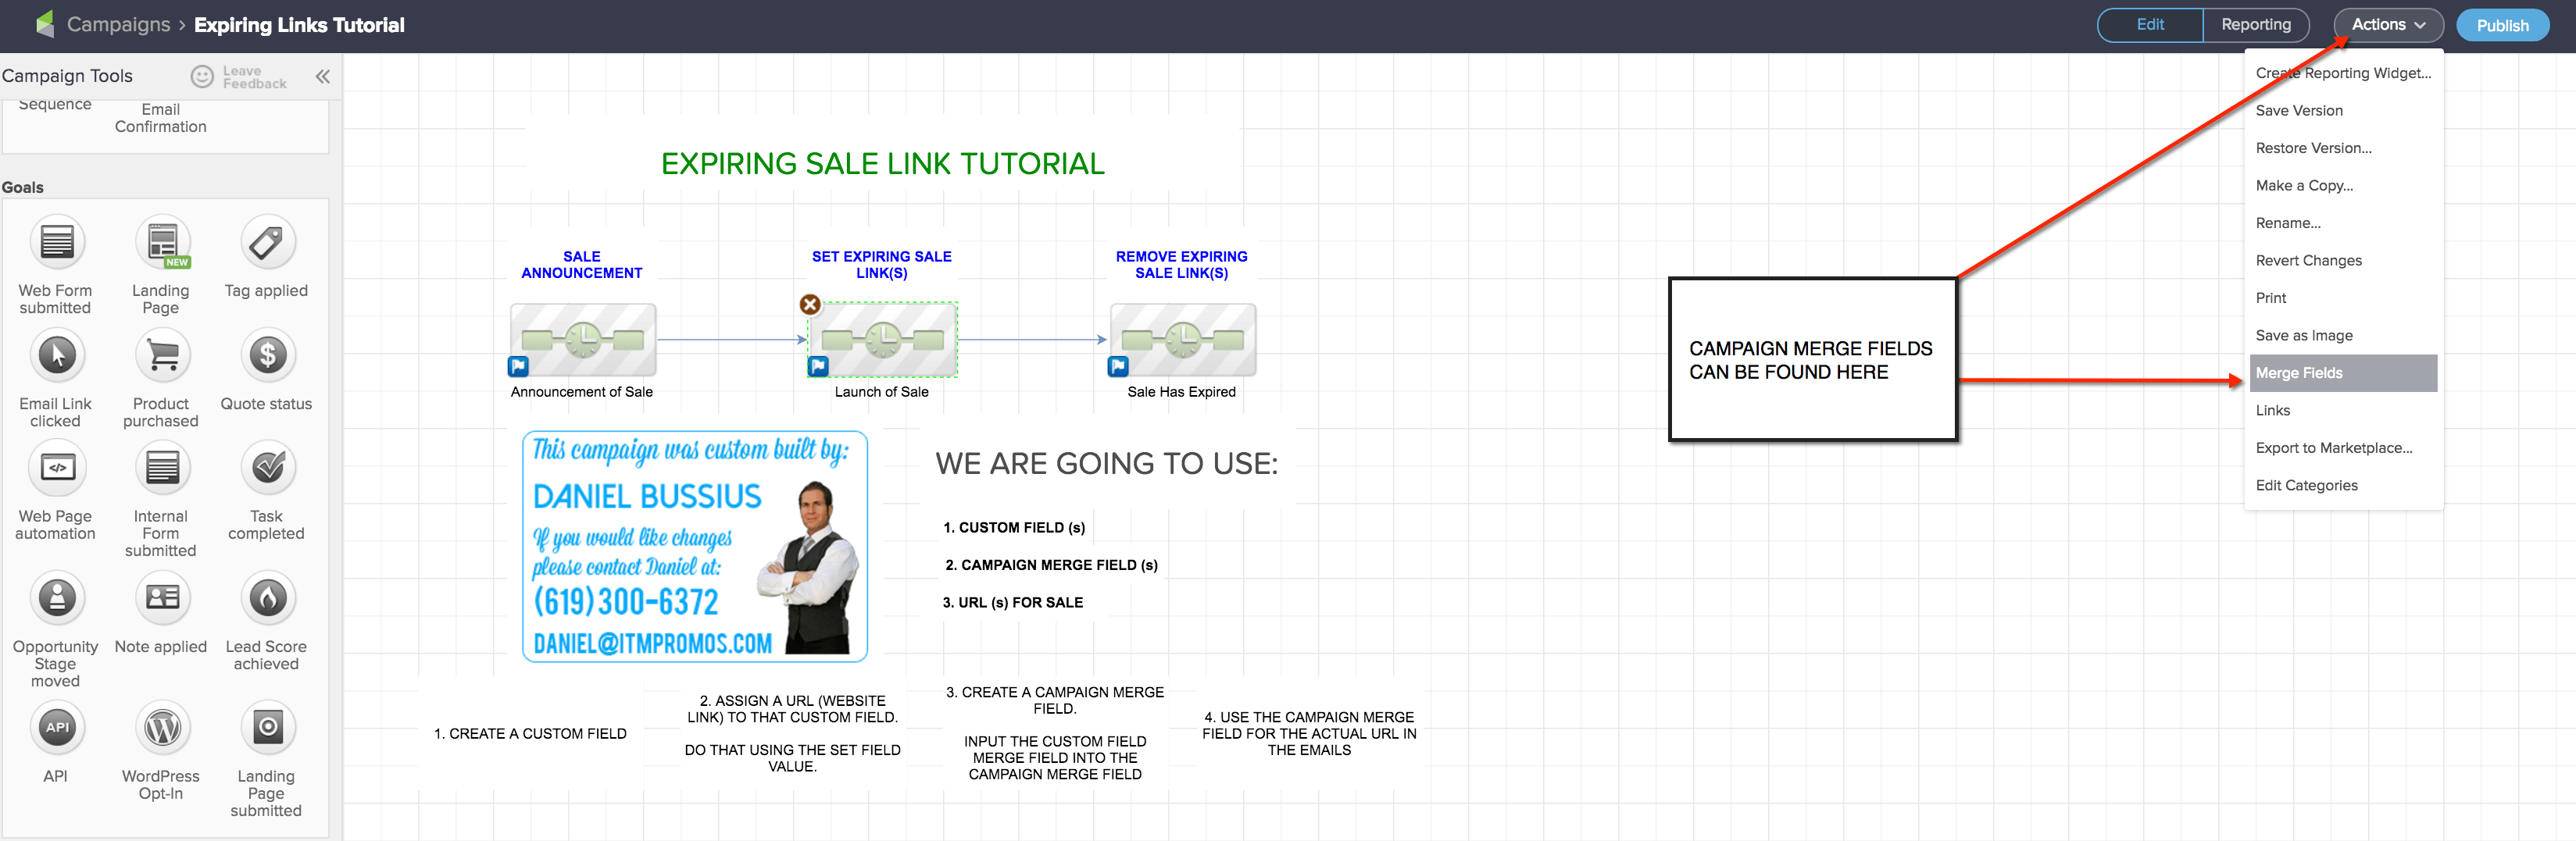
Let's create that Campaign Merge Field. You will go to the top right of the screen in Campaign Builder and, under "Actions," select "Merge Fields."

Click the image above to zoom in.
Now that we are in this section, click "Add Merge Field" and under the "Merge Field Label" name the field whatever you want. Under the "Merge Field Value" section, input the Custom Merge Field link that you copied from the previous step.
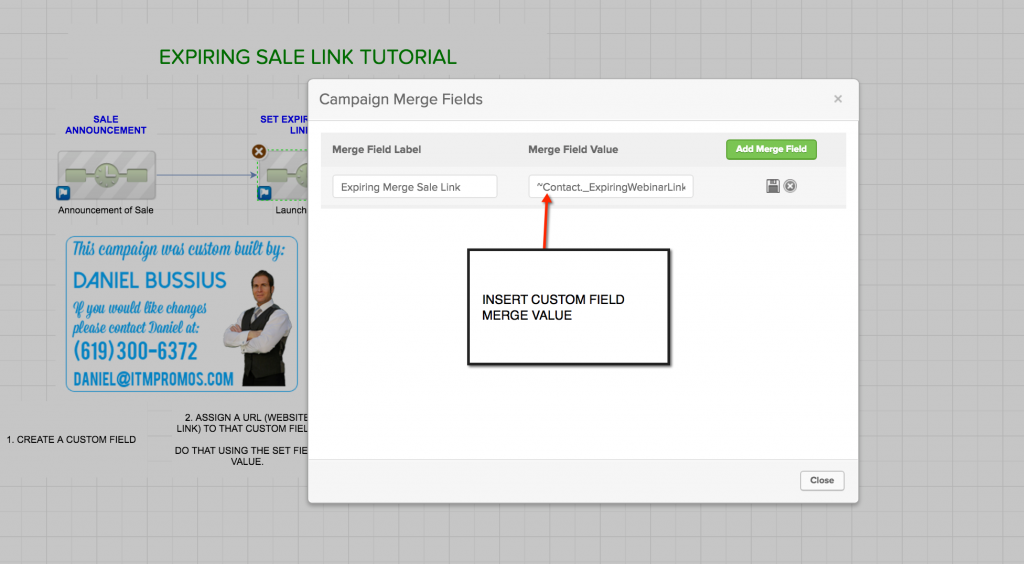
Click the image above to zoom in.
Step Four:
Place the Campaign Merge Field As The URL In Your Emails
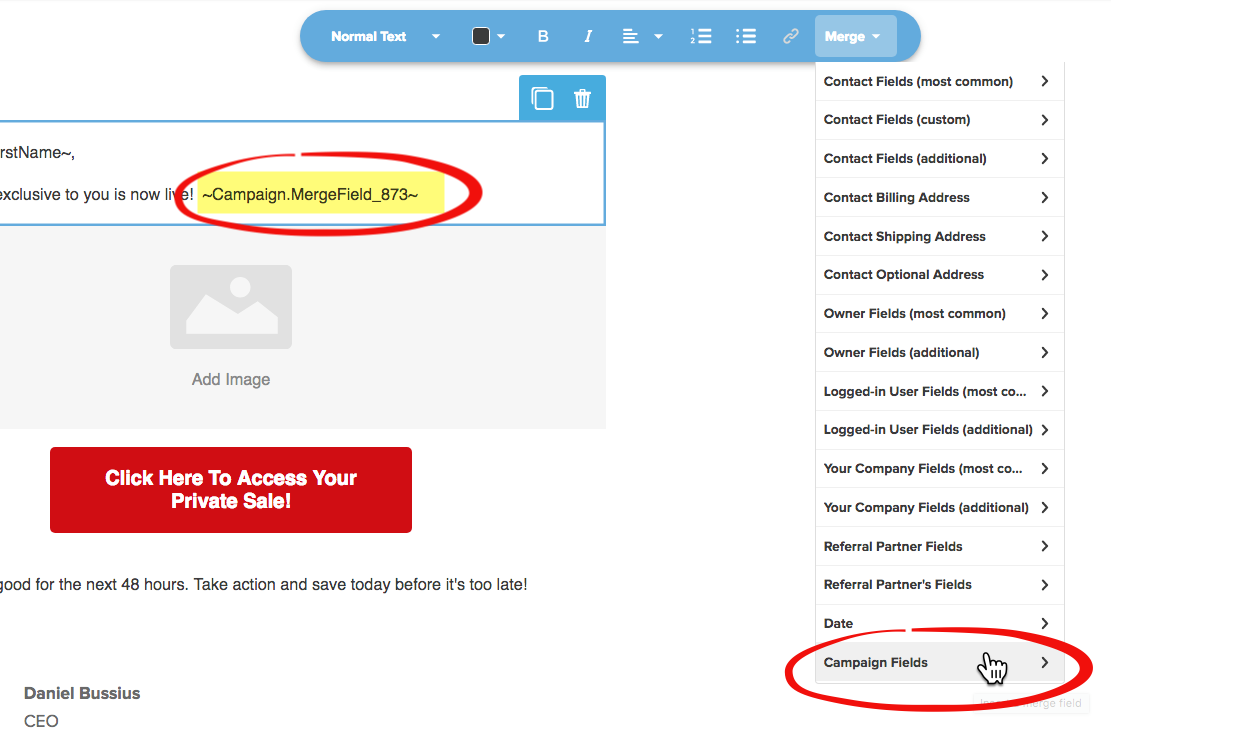
Now we have the easiest part to do, which is adding the Campaign Merge Field in our emails as links.
I want you to open your email inside "Launch Of Sale" and wherever you want the link for your sale to be, you are going to use the Campaign Merge Field.
For this example, please add a button to your email. Once you have added the button, click your mouse anywhere in the email where there is text.
Now, using the floating editor, click on "Merge" and then scroll down to "Campaign Fields." Click that and then select your newly created Campaign Merge Field.

Click the image above to zoom in.
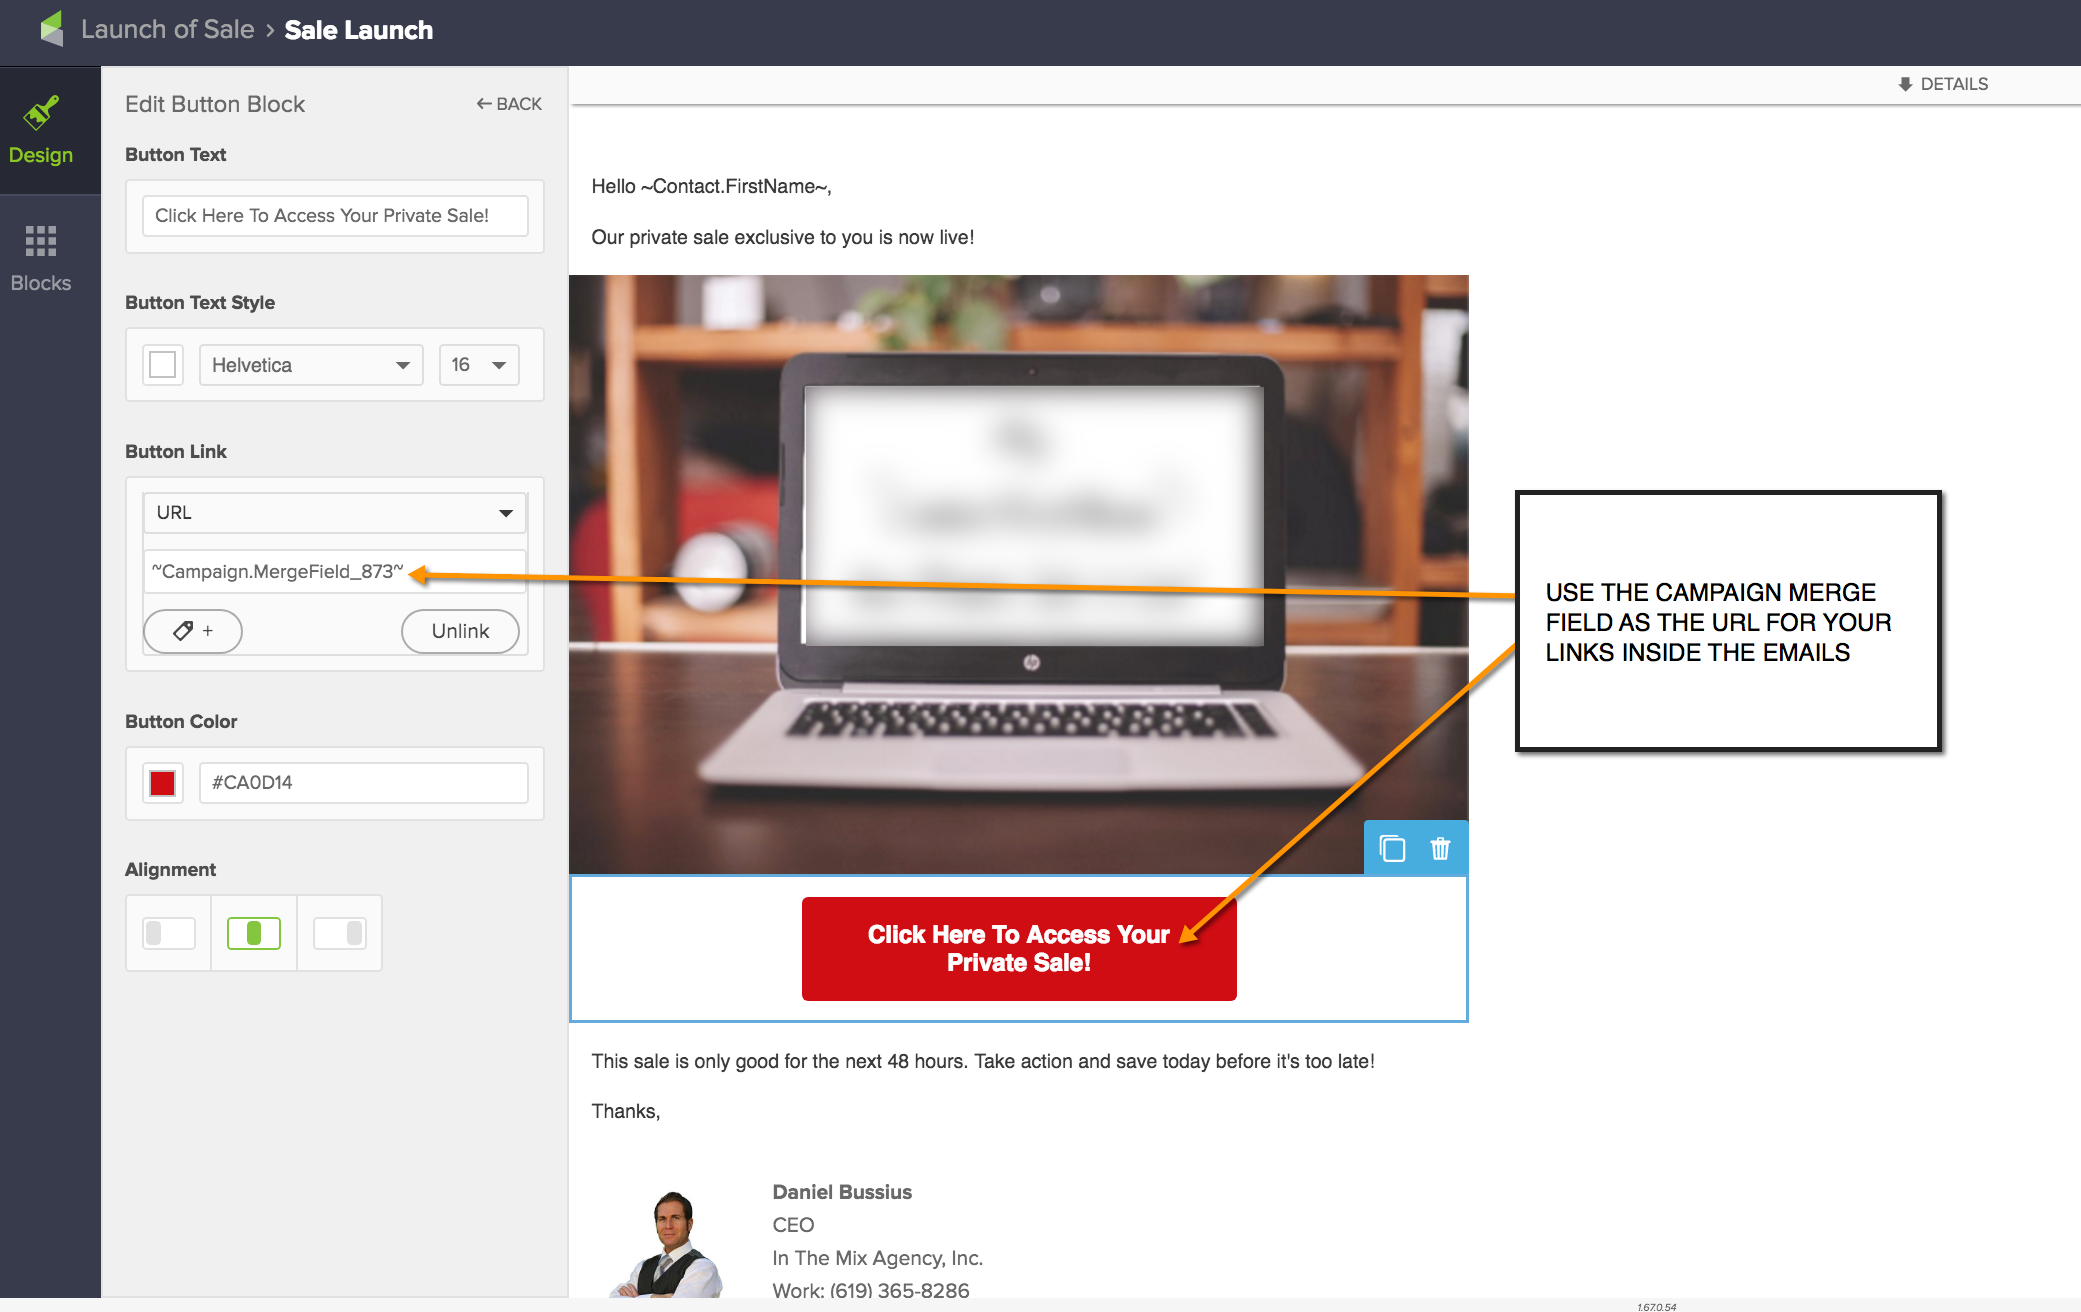
Once you have done that, you will see the merge field link which I highlighted in the image above. Cut and copy this link and make sure to include the ~ ~.
We are now going to go back to our button we added and click the button. Once you have done this, for the Button Link, select "URL" and then paste in the Campaign Merge Field. That's it!

Click the image above to zoom in.
Step Five:
Set The Expiring Link In The Custom Field
We are now at the final step, which is also the easiest step!
Congrats on your progress setting up this campaign, you rock star!
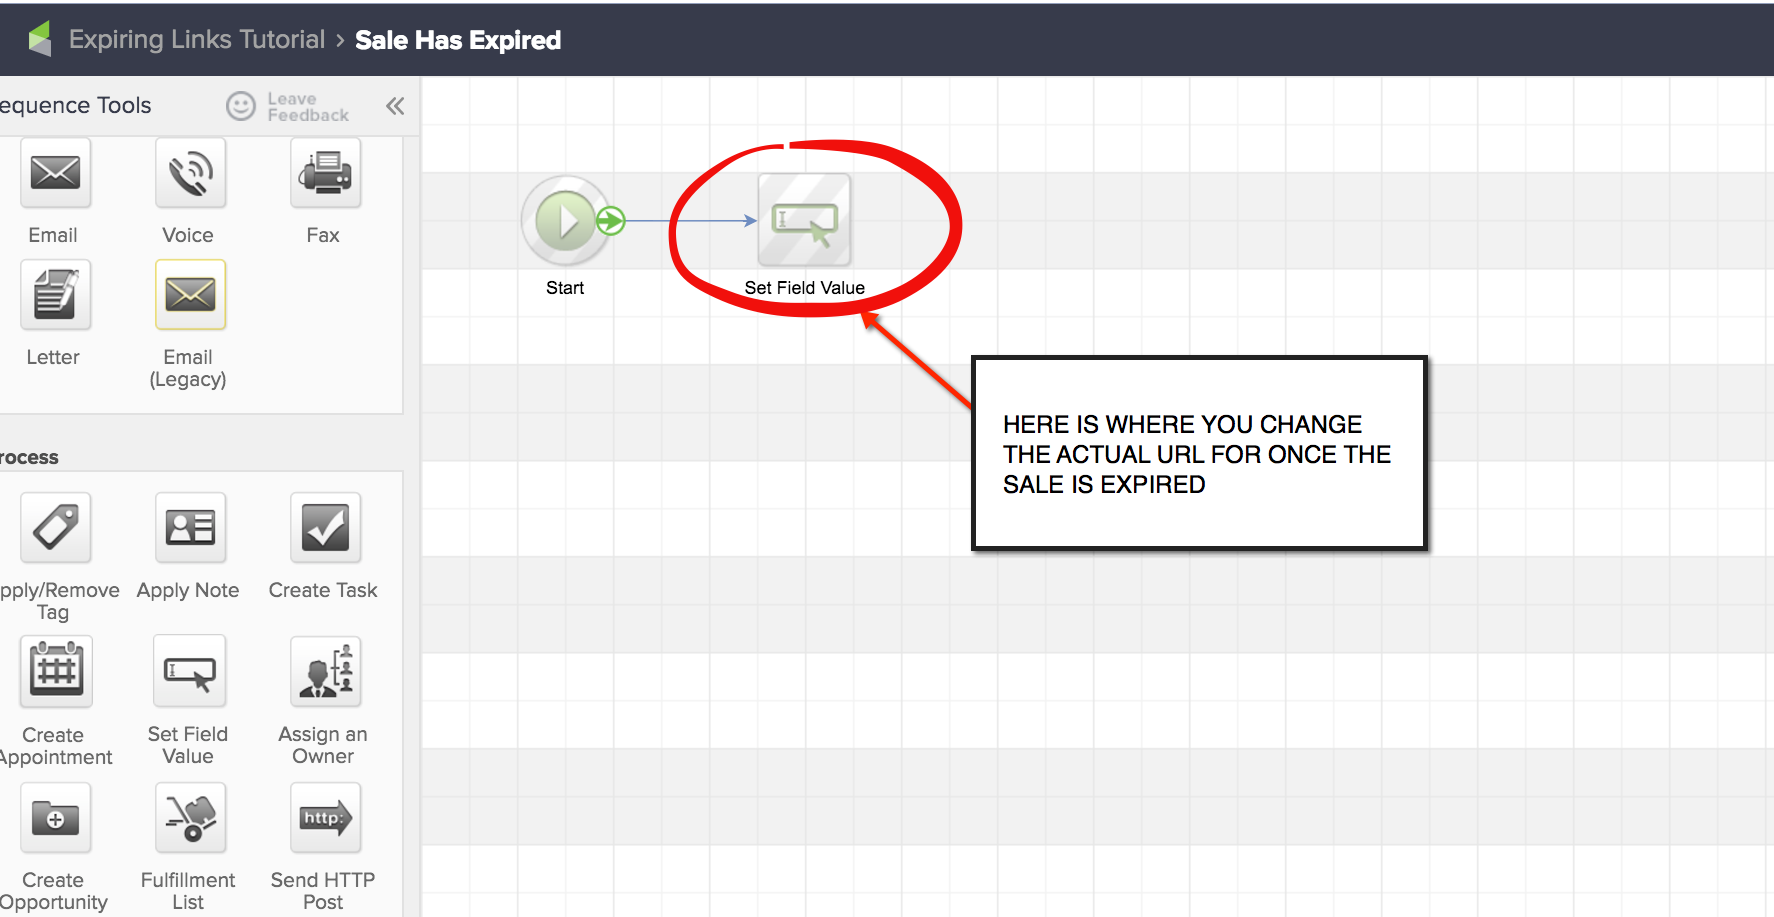
You are going to begin at the main Campaign Builder screen. Then, click into the third and last campaign sequence named "Sale Has Expired."
Click the image above to zoom in.
Inside this campaign sequence, add a "Set Field Value" widget and then double click to open it.

Click the image above to zoom in.
You are going to now choose the same Custom Field you chose earlier in this tutorial but, this time, you are going to paste in the link you want for once the sale is expired.
This link you are pasting in is what you would want the person to see if they try to access the sale after it is expired.
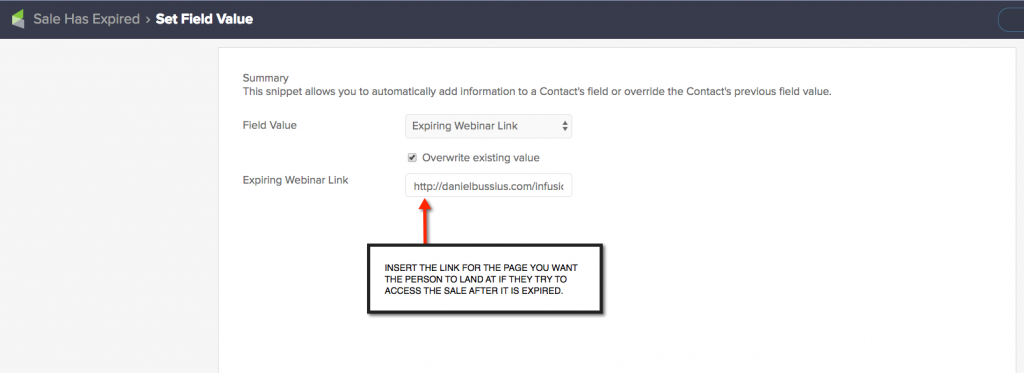
Click the image above to zoom in.
You can go super basic and just use the home page of your website or you can get fancy and build a special page acknowledging that they missed the sale.
This is totally up to you, but once you have inserted this link ... you are done!
Congratulations on finishing this tutorial! Now, write your post-sales and sales emails and go make a bunch of money using dynamic sales links for your sales campaign!
Questions? Comments? Contribute below!
Did You Find Value In This Training? If So, Share It!
Download Your FREE Guide and Get A Bonus Tutorial To Create Personalized Images In Email!
Enter your details below and claim your free PDF of this tutorial showing you how to create dynamically changing sales links.
You'll also get a bonus tutorial teaching you how to embed pictures with custom copy written on the pictures embedded in your email!


